Campaigns
Creating campaigns
General
To create a new campaign go to Menu > Campaigns > New campaign
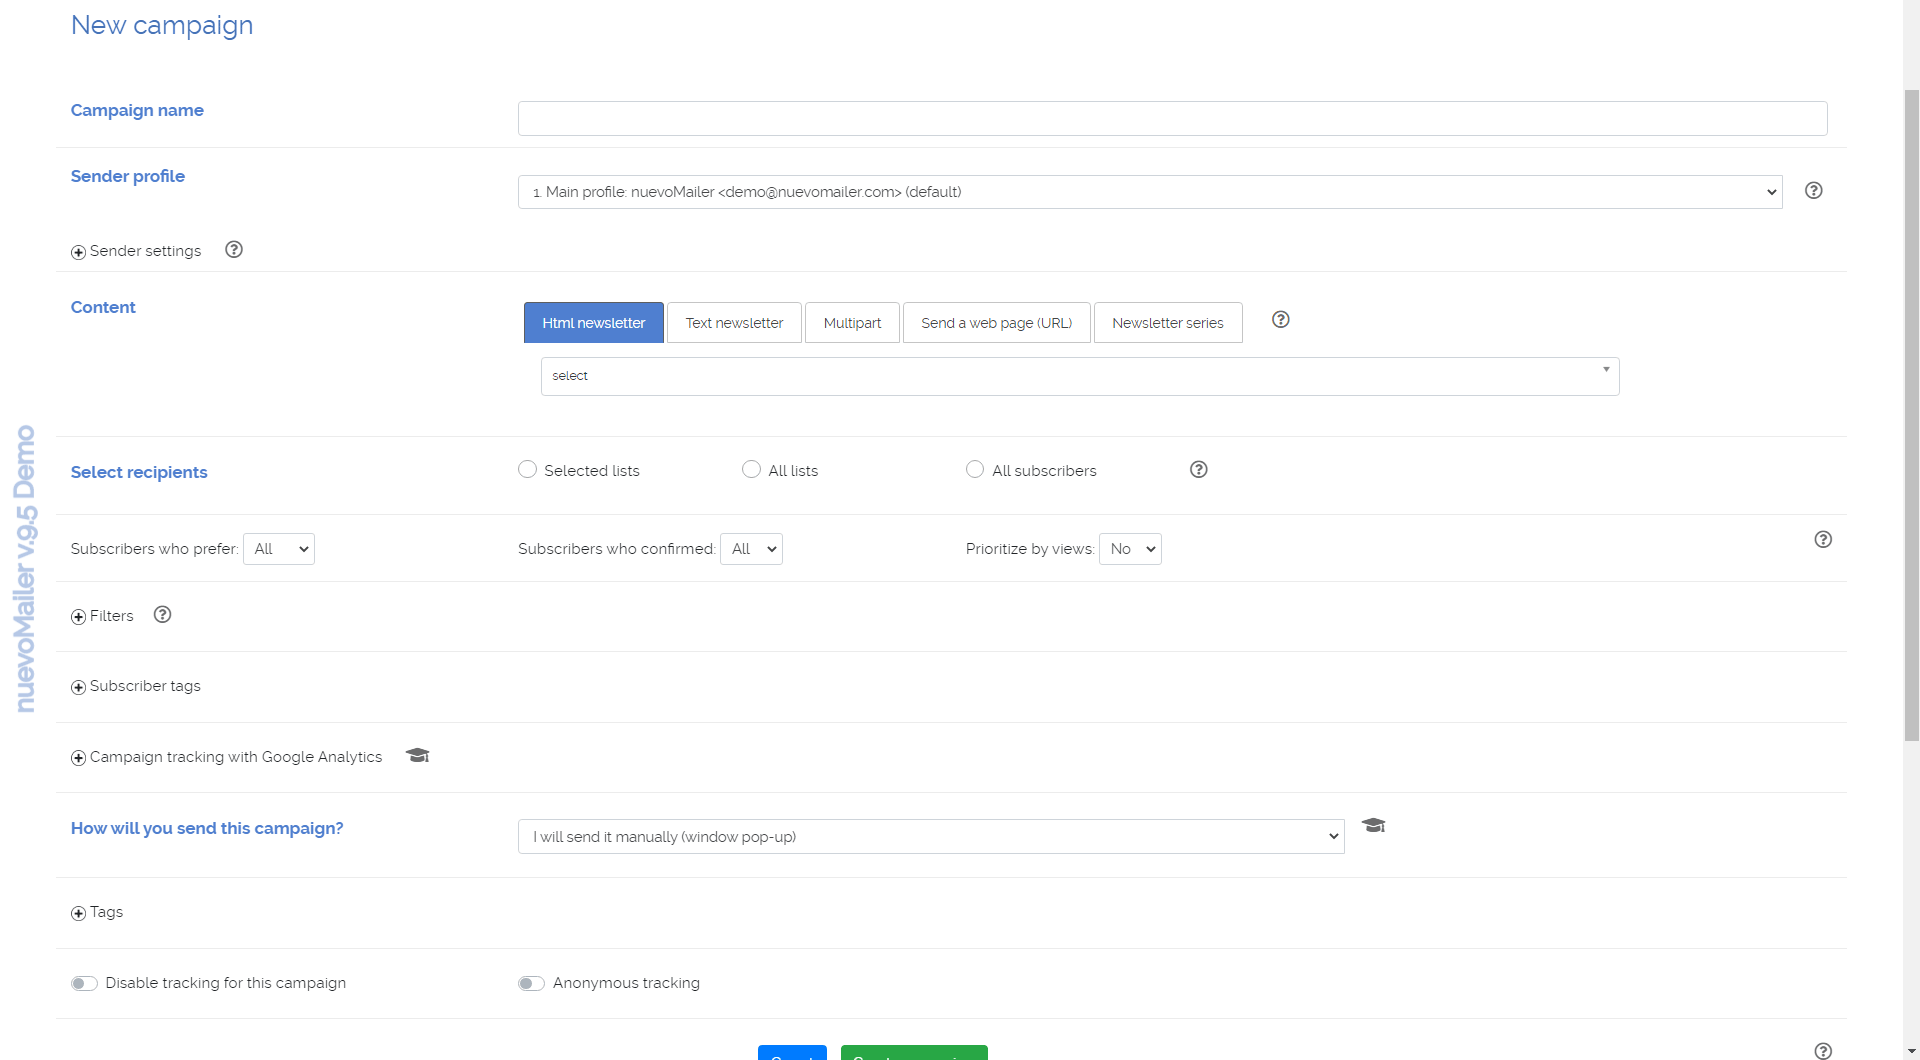
For tips about each option point your mouse over .
For tips about each option point your mouse over .
- Use different sender settings
First you select a sender profile. Optionally you can define the <From-name>, <From-email> and <Reply-to-email> values just for this campaign.- The custom sender settings (at campaign or autoresponder level) will override the the sender profile settings.
- Some SMTP servers may not accept these custom values and instead use the actual <From-name> and <From-email> used for SMTP authentication.
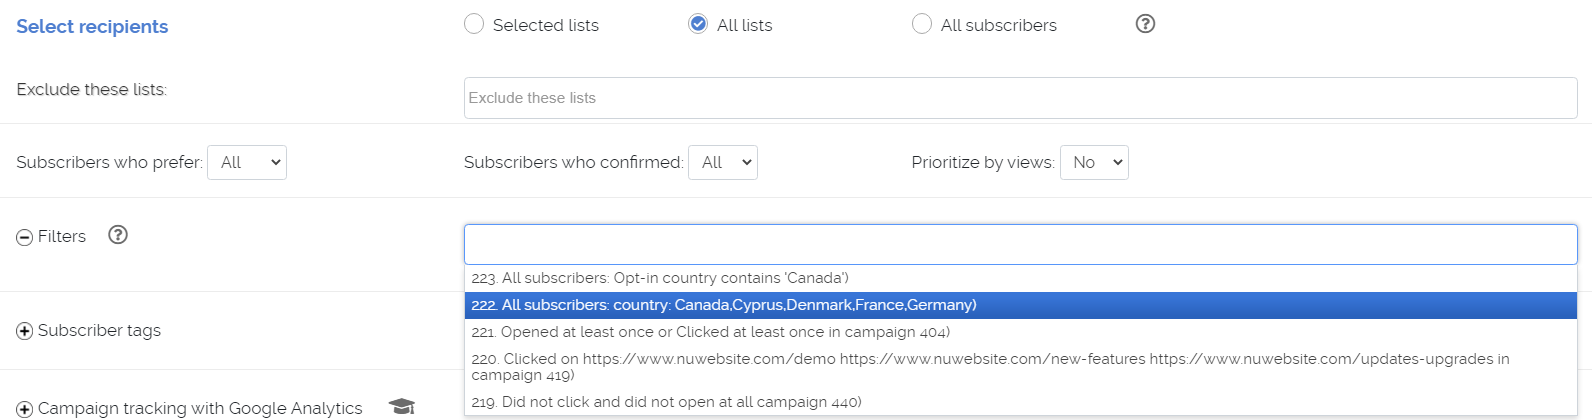
- Filters
This option is available when sending a campaign to “all lists” or “selected lists”. - Subscriber tags
This adds another layer of segmentation. It has the same effect as using a filter. -
Subscribers who confirmed
This option is available when sending a campaign to “all lists” or “selected lists”. A subscriber has a confirmed/verified status at list level. If the subscriber is confirmed for at least one list (but perhaps not in others) then he will receive the email. - Campaign & Autoresponder tags
You can use tags to group/categorise your campaigns. - Disable tracking for this campaign
Clicks & views will not be recorded. - Anonymous tracking
With anonymous tracking you will see Total but not Unique ratios. Only total clicks per link are reported.
Emails clients and Geolocation reports are not affected.
Bounces, Complaints and Opt-outs will work normally.
Triggers will not fire. - Excluding lists from campaigns
Since nuevoMailer v.8.6 you have a new option: This option is available when you choose "All lists" or "Selected lists".
Looking at the example picture above it means, that if a subscriber belongs both to list 35 (or 8) but also to list 2 then he will not be part of the campaign.
In other words, the campaign will target subscribers who belong to lists 35 and/or 8 but if some of them belong also in 2 they will be excluded.
Prior to v.8.6 this was done by using filters.
You can create a campaign even if the count returns 0. This is because you may want to schedule this campaign (or execute it at a later time).
Multipart content
When you send both an html and a text newsletter at the same time then you are sending a multipart newsletter.
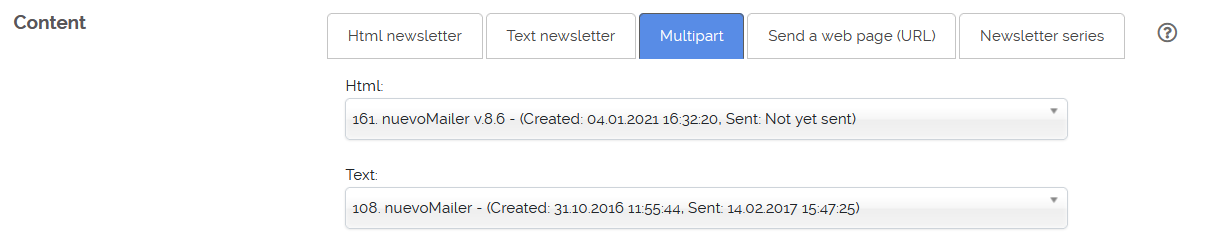
- If a recipient’s email client cannot display html it will display the text version. Both parts will be personalized and tracking links will apply.
- There is absolutely no compromise with this method. But there is a downside: too large size of an email since in essence you are sending a double-sized email per subscriber. And in fact you must prepare two newsletters for each campaign.
- A trick that may save you time is to prepare the html one and then automatically create a text version of it.
- If you have subscribers that are likely to use old email clients that cannot read html, sending multipart emails ensures that they will eventually be able to read your newsletter.
- Tests have indicated that a multipart newsletter is treated better by spam filtering engines.
In a campaign every html email becomes automatically multipart
Since version 6.5 every html email becomes a multipart.
A text part is automatically added with a link to read the html version in your browser. You can change the introductory comments in your languages file.
You can turn this feature off in your configuration settings (v.9.5+).
Since version 6.5 every html email becomes a multipart.
A text part is automatically added with a link to read the html version in your browser. You can change the introductory comments in your languages file.
You can turn this feature off in your configuration settings (v.9.5+).
A very effective trick
The idea is to make a multipart campaign where in the text newsletter you have a smart link to redirect the subscriber to read the html newsletter in the browser.
The following picture explains this idea better. You can vary the text as you like but the special link must be like this: [browser_link]
Practically it works exactly like the “Smart link” that you have in html newsletters “Read this newsletter in your browser”.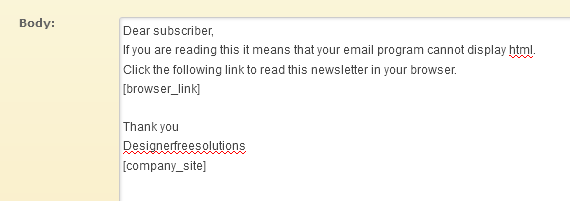
Send a web page (URL)
You can send a web page that is located on a web server by giving the URL of this page (and an email subject). The result is like sending an html newsletter.
 If your page contains images and references to css files these should be in absolute/full path.
With this method views and clicks tracking works in exactly the same way when you send an html newsletter.
You can use personalization tags: [sub_name], [sub_email] etc.
You can use smart links such as:
If your page contains images and references to css files these should be in absolute/full path.
With this method views and clicks tracking works in exactly the same way when you send an html newsletter.
You can use personalization tags: [sub_name], [sub_email] etc.
You can use smart links such as:
<a href="webpagelink" target="_blank">Read this in your browser</a>

<a href="friendforwardlink">Forward to your friends</a>

(Change the wording as you like.)
For opt-out links you have two options.
- Automatically append an opt-out link at the end of the newsletter by clicking the checkbox that you see* or
- Insert a link anywhere else you want with this code:
<a href="list_optout">Opt-out from this list</a>

<a href="global_optout">Global opt-out</a>

<a href="account_login">Subscriber account_login</a>

(Change the wording as you like.)
A/B split testing
A/B testing can be used to test differences in response rates (views & click-through ratios) to different content (newsletter in this case)
among your recipients. Here is how it is done:
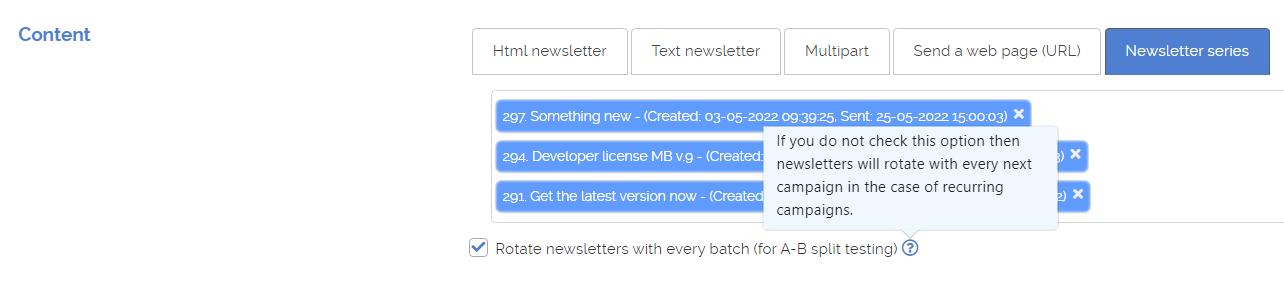
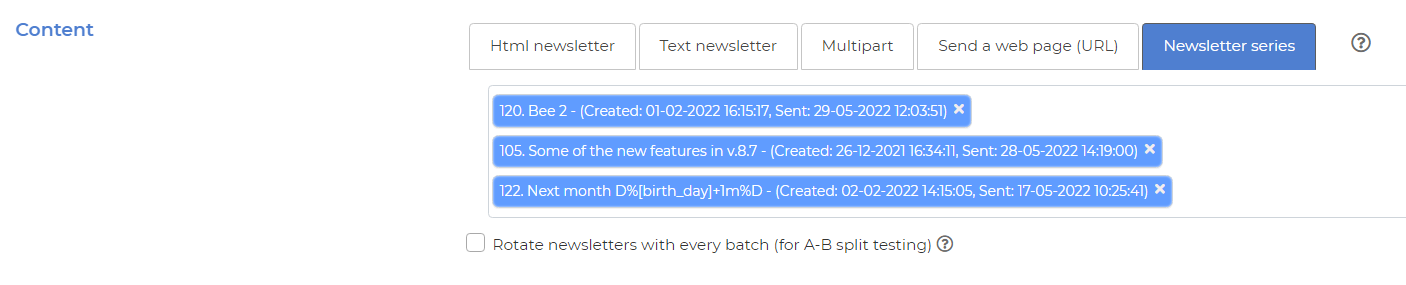
- You create the campaign using a Newsletter series.
- You can use as many newsletters as you like.
- Make sure you check Rotate newsletters with every batch (for A-B split testing).
- Select your lists.
- Make sure that you use batch settings for this campaign.
- Start the execution manually or schedule it.
- Let your campaign run for some time until several batches are sent.
- Go to your summary report. It will probably take some time until statistics start to accrue. Click the A/B button:

- You will see this report:
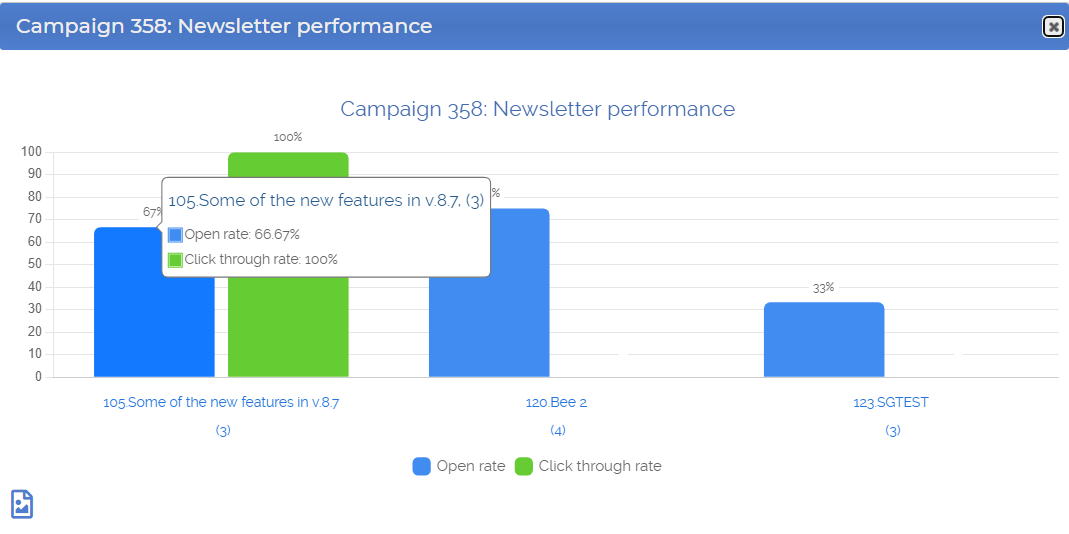
- You can pause and edit your campaign, choose the best performing newsletter and resume it. Or not, you can just let the campaign continue as-is.
- What you see in the report are ratios. The numbers in parentheses show how many times the newsletter was sent.
- It is recommended to let the campaign run some rounds (batches) in order to have a large enough sample for all newsletters.
Batches and timing
- It is highly recommended to use batches when sending.
- It improves deliverability and eases the strain on the server.
- Batches help prevent server time-outs.
- Batches can help you conform with your Host's quotas (number of emails per hour/day). Consult with your Host or SMTP provider to find these quotas.
- When sending manually with a pop-up window the applicable batch settings come from the sender profile you have selected for this campaign.
You can set these settings in the page where you edit the Sender profile. The pause (batch interval) works as an exact pause. You will see your pop-up window reload exactly
after the pause.
The pause (batch interval) works as an exact pause. You will see your pop-up window reload exactly
after the pause.
You can use any number of minutes for pause or 0 or fractions of a minute like 0.5.
- When sending with cron you can set the batch settings specifically for a campaign. In this case the Sender profile batch settings are overridden.
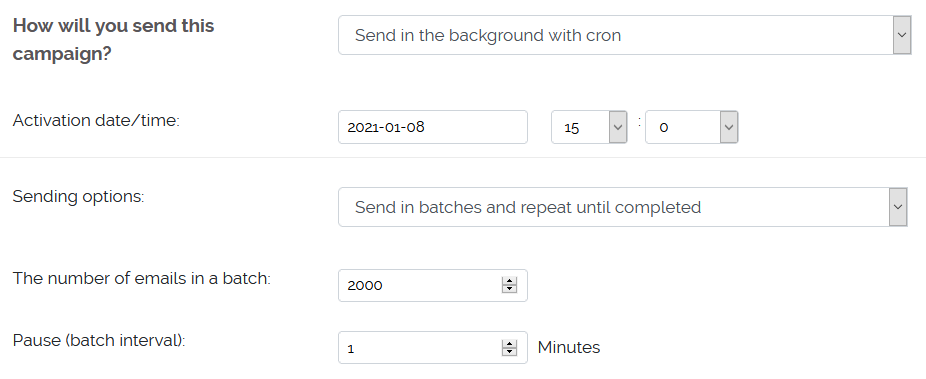
In this case the pause (batch interval) works as a minimum safe distance between two batches.
You can use 0 for pause and let the cron period regulate the timing (unless of course you have more specific requirements).
A rough example:
Assume your cron hits every 5 minutes. But for this campaign you want to have at least 10 minutes break before the next batch starts.
So you use 10 minutes for pause. In your activity log you may see lines similar to this:
In other words: only 9 seconds elapsed since the last batch finished. But the pause is 10 min (600 secs). So it will stop now and it will check again with the next cron run.Task: 3-->2014-12-15 16:27:24-->Check-point-5.-->STOP. Time since last execution: 9 Batch pause: 600.0
What batch settings to use?
- General considerations
- How fast/slow you want to send.
- Hourly, daily or throttling restrictions imposed by your Host or Smtp service provider.
- The time-frame in which you want your campaign to be sent (specific days or hours).
- Time-outs: if a batch starts but never completes this is probably because it exceeded the max_execution_time defined in your PHP settings. Raise this variable to 300-600.
- Always check your Activity log to monitor the sending process.
- With cron jobs - Single threaded campaigns
- A very large batch does not mean that you will send faster.
- Simple calculations:
If your cron job runs every 5 minutes then it will run 12 times per hour (60/5).
If the batch size is 500 then you will send 6000 emails/hour (500x12). - The objective is to minimize idle time.
Idle time is the time between the moment a batch completes and the next cron hit. See below. - A cron hit (job) starts a batch. Depending on the batch size this will take some seconds or minutes to complete.
In this (simplified) example the batch completed in 2 seconds and the idle time is almost 5 minutes (difference between the last two lines).
This means that we can increase the batch size a lot more (or have the cron job run more often or both).322034 28/09/2021 13:25:02 Task: 0-->Cron hit 322035 28/09/2021 13:25:03 Task: 45-->Campaign 400-->Started processing batch. 322036 28/09/2021 13:25:05 Task: 45-->Campaign 400-->Completed batch and pausing. 322037 28/09/2021 13:30:03 Task: 0-->Cron hit - Of course, not all batches take the same time to complete. There are discrepancies (smtp, network etc).
Ideally a batch should complete just before the next cron hit.
But even if it doesn't there is no reason to worry. The cron job sees that it is still processing the previous batch and it will stop. - Batch sending time
There is no standard here. Some smtp servers send faster than others some slower.
If you use "Throttling / Maximum send rate" then this adds to the sending time.
Do some tests: set a batch of X emails and start the campaign manually. Then check your log file to see how long it took.
Do your calculations as explained above and then schedule this campaign.
- Sending manually (pop-up window)
- When sending manually the idle time is simply the batch pause. The flow and timing is much simpler.
- Bath starts - <...sending...> - Batch completes - <...pausing...> - Bath starts again
- Your activity log again records the Start & finish times.
- To send faster set a very low batch pause (or 0 or fractions of a minute like 0.5). In this way the pop-up window reloads almost immediately after a batch completes.
- To send slower simply increase the batch pause.
Google analytics
- Optional. Can be used with or without the clicks tracking of nuevoMailer. Learn more
- Applies only to html newsletters.
- When using Google Analytics what you actually track is the website(s) traffic that results from the links in your newsletters.
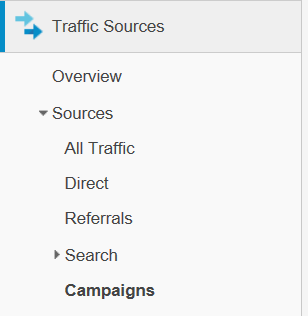
You can track the behavior of the subscribers who followed these links inside your Google Analytics account by going to Traffic sources > Campaigns. - In short, your newsletter becomes another source of traffic and this can be tracked.
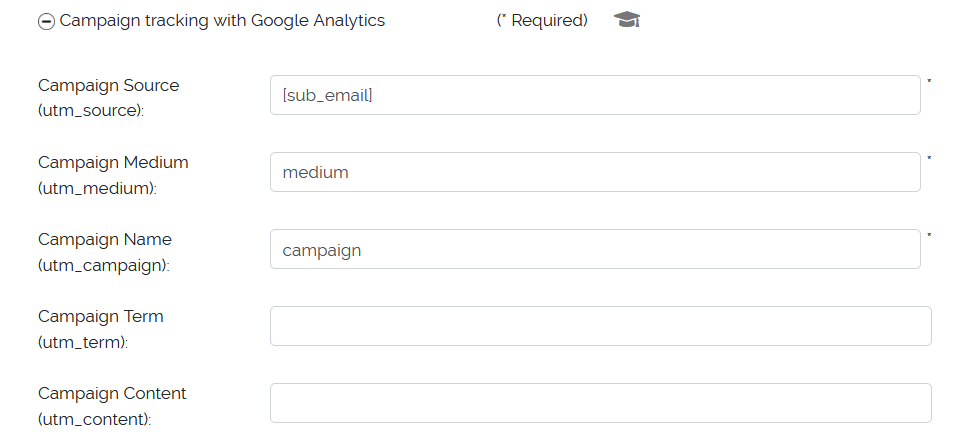
Which means that you must already be using Google analytics at the sites you want to track. - The URL building is done automatically by nuevoMailer. It parses the links in your newsletter and adds the campaign parameters as required by Google.
- If needed you can use subscriber personalization tags as indicated in the picture above. For the campaign id you can use [camp_id] This is not activated by default but you will find the code to activate it in the file /inc/rdr.php (bottom).
- Google Analytics link parsing of nuevoMailer works with or without the internal clicks tracking mechanism. In fact it works as an extension to the internal clicks tracking mechanism.
Sending campaigns
You can either send the campaign manually or with cron (scheduling).
Manual execution requires that you keep your browser open. It is handy for small campaigns and testing.
With cron everything is done in the background at the server. Learn how to set-up a cron job here.
Manual execution requires that you keep your browser open. It is handy for small campaigns and testing.
With cron everything is done in the background at the server. Learn how to set-up a cron job here.
Your activity log and why it is important
Whether you send manually or with cron a log is created. To see it go Menu > Campaigns > Activity log.
Whether you send manually or with cron a log is created. To see it go Menu > Campaigns > Activity log.
- It shows if you cron job is reaching your installation and whether there are any problems with it.
- It shows potential campaign errors (smtp errors etc).
- It provides details about the timing of your campaigns: which campaigns are sent, the time it takes for a batch to complete etc.
- It gives insights whether your batch (and related) settings are optimal.
Editing a campaign
Go to your campaigns page. You will see these options: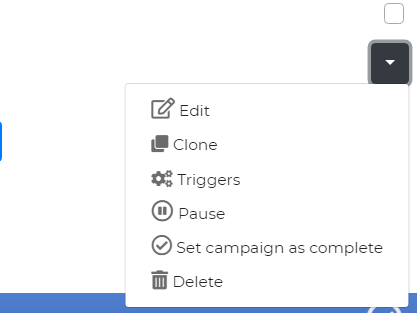 To make changes to a running campaign (even if the mailing has started). Click the "Edit" icon. Your changes will take effect with the next batch.
Go to your campaigns page. You will see these options:
To make changes to a running campaign (even if the mailing has started). Click the "Edit" icon. Your changes will take effect with the next batch.
Pause - resume a campaign
If for any reason you want to stop your mailing then click the "Pause" icon . The pause is effective when the currently running batch is complete.
Then at anytime later you can click the "Resume" icon . The sending will continue from where it stopped (either by cron or manually).
There is no need to pause the campaign just for editing it but it is a good practice.
If you make changes to your newsletter while the campaign is running then these changes will take effect with the next batch.
Campaign completed webhook (v.10.0)
When a campaign ends the function campaignCompleted($idCampaign) is called. You will find this function in /inc/classCampaign.php.
You can use this call to retrieve and share campaign data (optionally using an existing outbound webhook).
By default it does nothing. In the file you will find sample code to see how to retrieve campaign details (content, etc) and process them.
One idea for example is to make a POST to an external system and publish the newsletter from the campaign.
Sending manually
To start a campaign manually go Menu > Campaigns > View & start campaigns.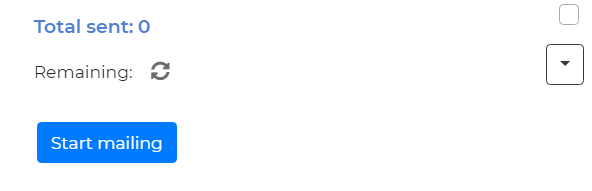
- Click to see the remaining emails to be sent.
- Click “Start mailing” to start the sending process. A new pop-up window opens and the button is disabled. Do not close your browser.
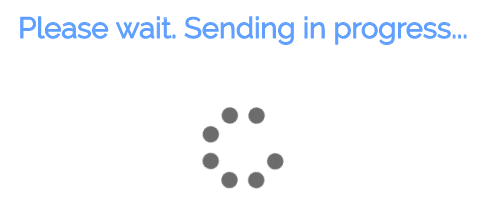
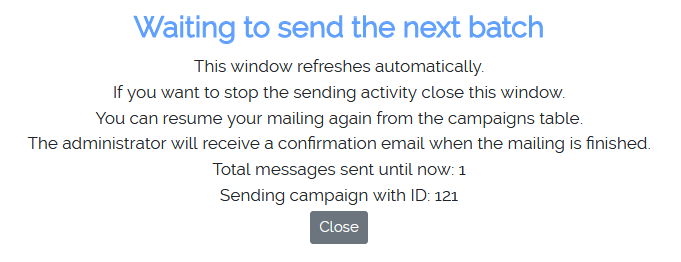
If you use batches then after a batch is sent you will see the following screen.
This window refreshes automatically after the batch pause and starts sending the next batch.
If you want to stop the mailing you can close the pop-up window.
However, some more emails will be sent (since the process is now running at the server).
This window refreshes automatically after the batch pause and starts sending the next batch.
If you want to stop the mailing you can close the pop-up window.
However, some more emails will be sent (since the process is now running at the server).
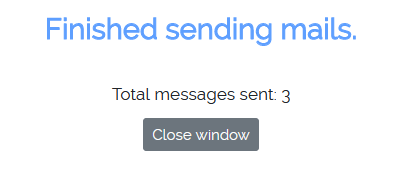
The process is repeated until all emails are sent. At the end you will see this:
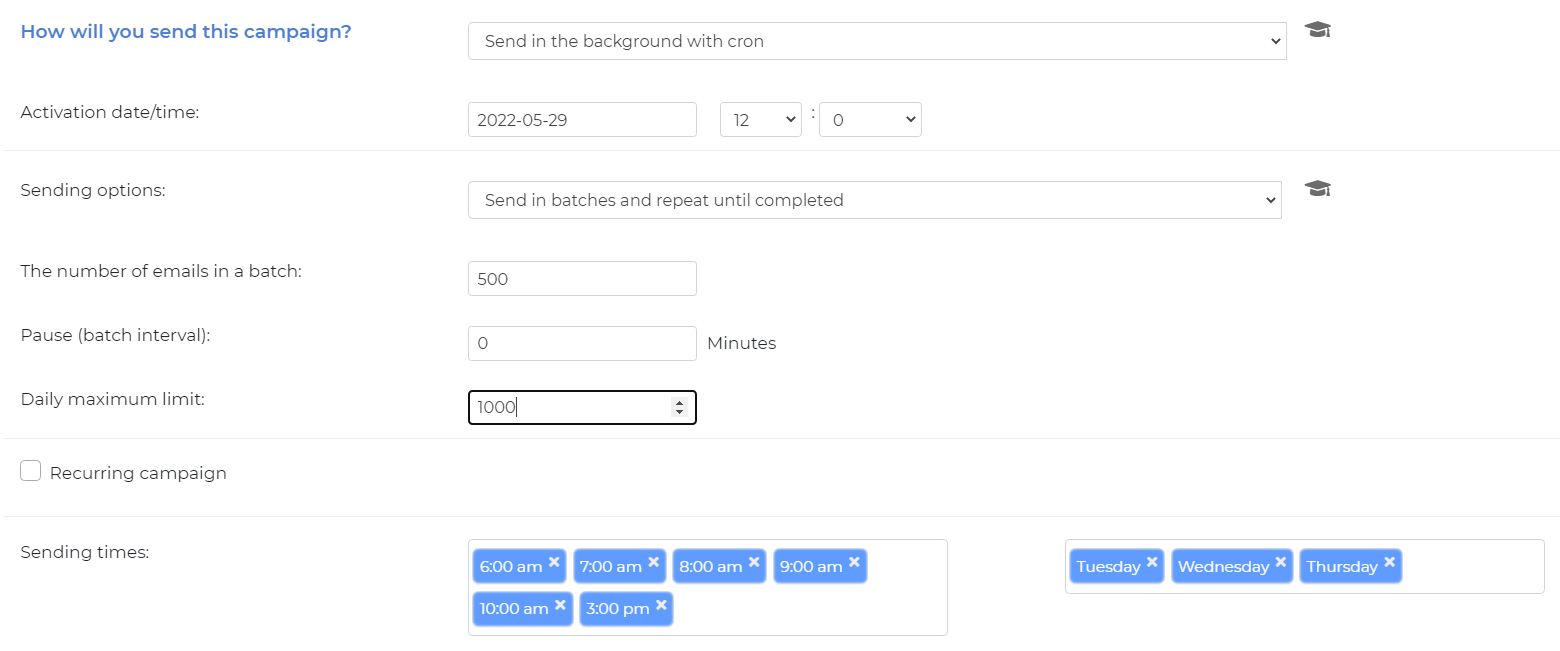
Sending with cron
When you schedule a campaign to run in the background using cron you have a few more options.


 Some examples
Menu > Campaigns > Autoresponders > Create new
Here is an auto-responder that is sent 20 minutes after subscribing to a list: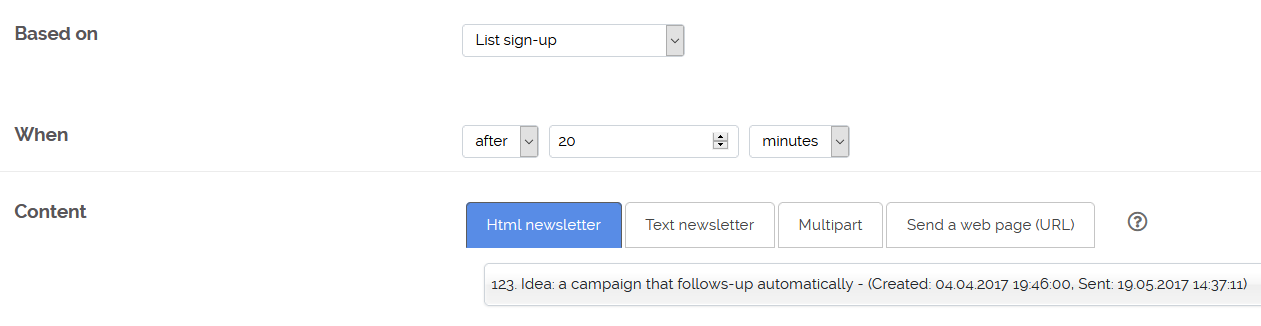
Here is another example based on a custom subscriber field Wedding date: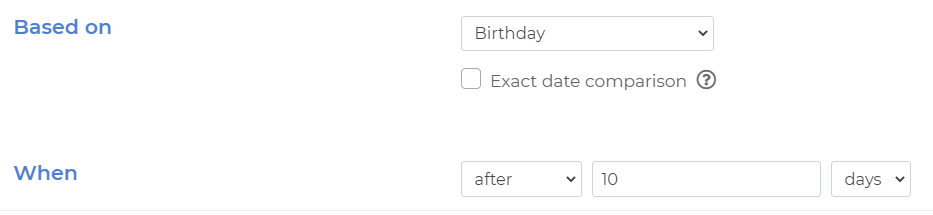 As you can see we have one more option here: Full date comparison.
When checked this auto-responder will fire only once, exactly 7 days after the exact wedding day.
If not checked then it will fire every year, 7 days after the wedding date. In this case the filtering is done by checking only the month and day (and not year).
With nuevoMailer you can capture (or import) your subscribers birthdays (or other anniversaries).
You create a birthday filter, a "Happy birthday" newsletter and a campaign that uses them.
The birthday campaign must be recurrent and run every day.
Filters are extra criteria that you can apply to a campaign and will result in excluding or including subscribers on the basis of demographic parameters, tracking behavior, subscription dates and more.
You can create a new filter by going to: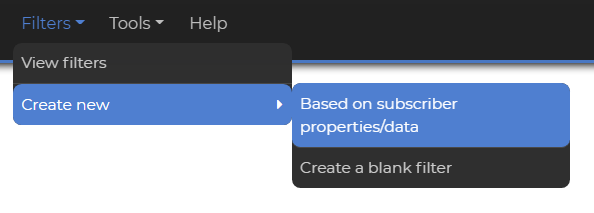
You can view your filters under Menu > Filters > View filters.
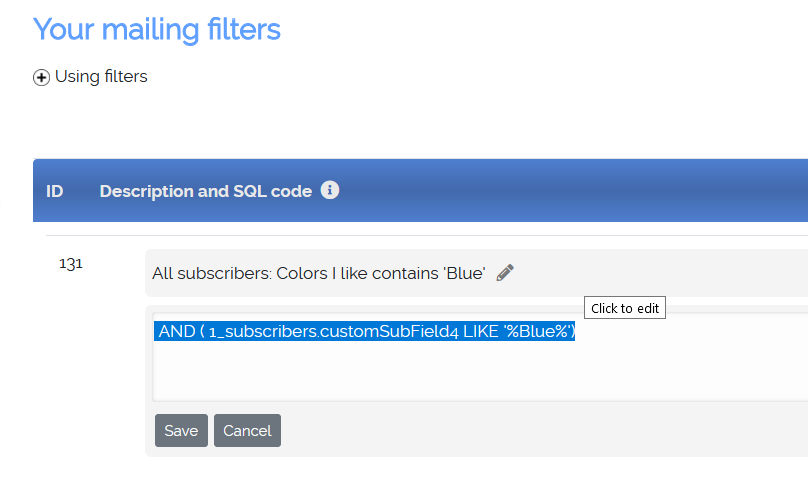
Every filter contains a short description and SQL code. You can edit both if needed. Simply click on the description or the code.
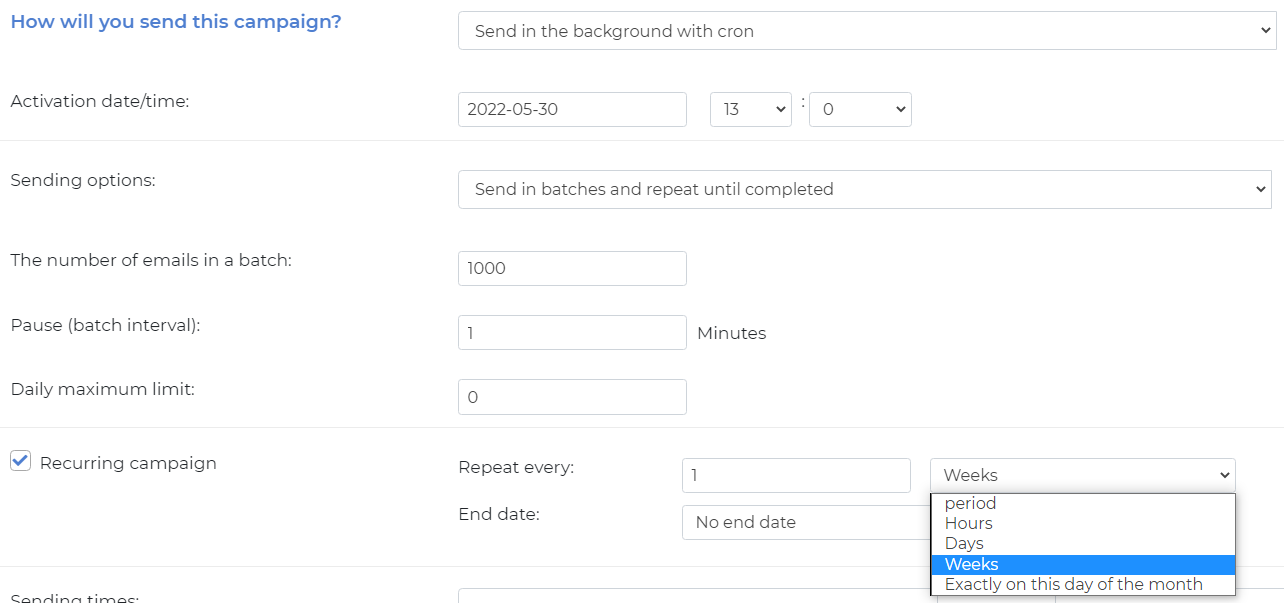
- You can define batch settings specifically for this campaign.
- You can set a campaign daily limit.
- You can set the hours and days when you want this campaign to run or leave empty to send 24/7.
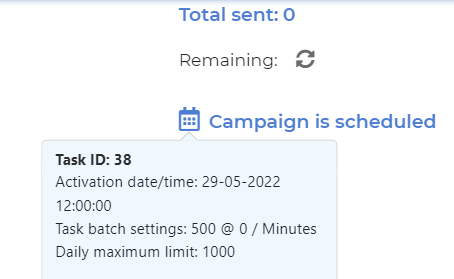
Looking your campaigns table you will see a calendar icon
Point your mouse over and you will see a pop-up with information about the campaign.
Point your mouse over and you will see a pop-up with information about the campaign.
You may edit, pause/resume a scheduled campaign.
If you are not sure whether your cron job is properly configured, check your activity log :
Menu > Campaigns > Activity log
Multi-threaded campaigns
In order to send a campaign using multiple concurrent threads you will need the multi-threaded sending plugin. This is an add-on that is not included in the core of nuevoMailer.
To create a multi-threaded campaign go Menu > Campaigns > Create a multi-threaded campaign
You have all the usual campaign options but with a key difference here:
To create a multi-threaded campaign go Menu > Campaigns > Create a multi-threaded campaign
You have all the usual campaign options but with a key difference here:
- The number of emails in a batch
Multi-threaded campaigns are sent in batches. This number refers to each thread. - Number of threads
you define here how many processes (threads) each cron hit initiates. - Distance between threads (seconds)
This distance refers to thread start times. So assuming you give a 5 seconds distance, every 5 seconds a new thread will start.
- Number of emails in a batch: 5000
- Number of threads: 20
- Distance between threads: 5 seconds
- A cron hit will initiate 20 threads that start every 5 seconds and each thread will send 5000 emails.
So each cron hit will process 100k emails.
What settings to use?
- MT campaigns are sent with a cron job. Refer to the install.html that you will find in your package for details.
- All these numbers are interrelated:
-Campaign size
-Batch size
-Cron period
-Number of threads (NOT)
-Distance between threads (DBT)
-REQUEUE_TIME_SPAN. You will find that constant at Menu > Tools > Configuration & settings: Additional settings : Multi-threaded sending plugin. Use 60-120 minutes (to be on the safe side) and leave it. You can read more details in the install.html. - Cron period, number of threads (NOT) and distance between threads (DBT)
NOT x DBT should better be less than the cron period.
For example, if you have 20 threads with 5 seconds distance, it means that the 20th thread will start at 100 seconds from the cron hit.
Which means it doesn't make sense to have a cron period of less than 100 seconds. - The campaign size, batch size and number of threads
If you have a 100k campaign and use a batch of 5k and 20 threads then theoretically a single cron hit would be enough to process the whole campaign.
It is recommended to use a small batch size and consume 2-3 cron hits to process a campaign.
Measure how long it takes to process a batch of 1, 2 or 5k.
Each batch size and thus thread should complete before the next cron hit. Not necessarily though and not for all threads. The 20th batch which will be closer to the next cron hit, will finish much later than the 1st and may pass the next cron hit.
You can over-flood the system with large batches, many threads and short cron periods and it will still handle it.
Run some simulation tests first (see next point).
Keep in mind that the Global Throttling / Maximum send rate is divided by the number of threads (for all sending methods except SMTP and PowerMTA/Pickup). - Simulation tests
In Tools>Configuration & settings you will see a sending method: Loop - no sending
This method is not sending. It merely simulates. So before going live you can create a campaign and watch the log file being updated to get an idea of how threads work.
Of course, since there is no sending involved, start to finish time will be considerably shorter. - APACHE configuration and errors
Apache may limit the maximum number of threads you can initiate. It's good to watch the Apache error_log file for any hints.
You may have to increase the MaxRequestWorkers & ServerLimit directives in your .conf file.
Also in the nuevoMailer log file if you see that a thread only starts after a previous one ended then this also comes from Apache. This may happen after after several threads were initiated. The first ones will start on time but eventually the server may delay subsequent ones.
Please refer here for further information. - PHP FPM tweaks
For the same reasons described above, you may need to raise the max_requests & max_children directives. More info.
Send-time optimization
Send-time optimization is a new intelligent feature introduced in nuevoMailer SB/MB v.10.0.
How it works?
The system collects data from subscribers clicks and opens and calculates the best time-frame (from hour - until hour) when most clicks or opens occur.
This information is passed to a multi-threaded campaign and every thread depending on the hour of the day will target subscribers that fall within this time frame.
In plain English: if a subscriber has more opens (or clicks) from 9-12 am the newsletter will be sent within this time-frame. Might be at 9am or 11 am. It depends on the overall campaign volume, speed and subscriber distribution within these time frames.
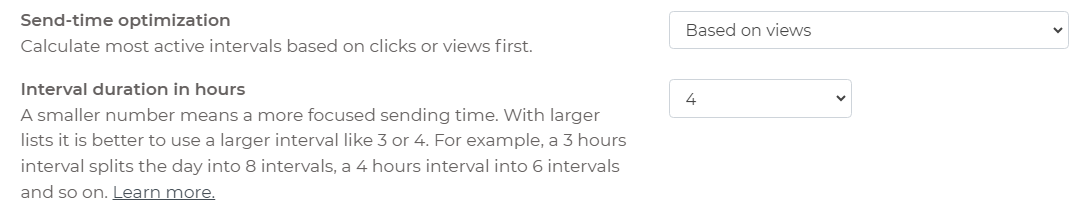
- Some key points
- You can decide to use either opens or clicks to calculate a subscriber's time frame.
- These time frames are also set by you. You split the day in 3 or 4 (or anything) hour intervals.
- A 2 hour interval means that you split the day in 12 periods (=24/12). A 3 hours interval splits the day into 8 periods (=24/3) and so on.
- Here is an example for a 4 hour interval (6 periods):
0:00 - 3:59
4:00 - 7:59
8:00 - 11:59
12:00 - 15:59
16:00 - 19:59
20:00 - 23:59 - The system needs data: it will not work with the very first campaigns you send. But as you collect views and clicks and subscriber accounts are updated it will become more accurate.
- Every time a subscriber clicks or opens a newsletter his time-frame is recalculated.
- Caution with very large campaigns
- Suppose you have 1 million subscribers that are designated to receive the newsletter between 8:00 and 11:59.
- But what if your sending capability is only 500k in these 4 hours?
- The result will be that the rest of these subscribers will be emailed the next day within this time frame. - Therefore although a multi-threaded campaign is designed to help with "send-too-many-too-fast", combined with send-time optimization and limited sending capability, may miss the "too-fast" parameter.
- On the other hand, the multi-threaded sending plugin becomes an excellent tool to fine-tune your campaign timing and increase subscriber engagement.
- The benefits of send-time optimization.
Recurring campaigns
General
A recurring campaign is one that runs periodically. E.g. daily, weekly, every few days, once a month etc..
Some examples
- Autoresponder campaigns. When you want to send a newsletter to new subscribers after X minutes (hours or days).
- Anniversary campaigns like birthdays. nuevoMailer greatly facilitates the collection of dates from your subscribers by having date-type fields.
- Your weekly, monthly news updates.
-
Asking subscribers to confirm
See also Re-confirmation campaigns
Sometimes your subscribers forget or neglect to confirm their subscription. The idea is to send confirmation reminder campaigns that start a few days after they subscribed and stop after a point in time.
For this example let's assume that:
- you want to remind them every 3 days
- start from the 10th and stop after 30 days from subscription.
This is your filter:
And your campaign settings:AND DATEDIFF(CURDATE(), iDate) <30 AND DATEDIFF(CURDATE(), iDate) >10

- If you define an End date then the campaign recreation process stops at this day.
- After a recurring campaign runs, a new one is created and the task points to this new campaign.
Campaign series
A campaign series is a type of a recurring campaign in which you can load a number of newsletters that will rotate with every next campaign.
Which day of the week? As you can see above we set the activation date on May 30th, 2020 which is a Monday.
Since the campaign repeats weekly it will be sent every Monday.
Sending once a month
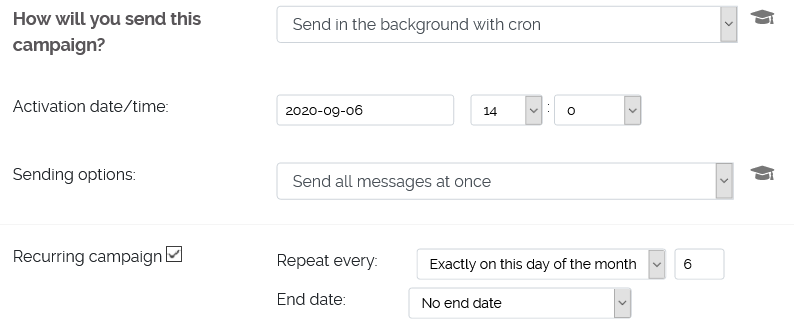 To set the day of the month set the activation date to the day you want.
In the special case where you want this campaign to be sent on the last day of the month choose 31 or 30. nuevoMailer will always pick the last day of the month whether that is 30 or 31 or 28 or 29.
To set the day of the month set the activation date to the day you want.
In the special case where you want this campaign to be sent on the last day of the month choose 31 or 30. nuevoMailer will always pick the last day of the month whether that is 30 or 31 or 28 or 29.
Sending a series of newsletters with recurring campaigns is optional
You can use only one newsletter in a recurring campaign and,
You can use only one newsletter in a recurring campaign and,
- Keep the same newsletter and edit its content just before the next campaign starts.
- Edit the campaign and choose a different newsletter.
Many authors find it convenient to send a web page as a newsletter.
What they do is to set-up the campaign as above, always use the same URL and just before the campaign starts they update their web page. You have many options.
What they do is to set-up the campaign as above, always use the same URL and just before the campaign starts they update their web page. You have many options.
Life cycle list management
Creating a campaign series is a good way for long term list nurturing. It is usually the first auto-responder emails and triggers that you will use to engage your subscribers. Then you can just put them in a long term campaign using a newsletter series.
Creating a campaign series is a good way for long term list nurturing. It is usually the first auto-responder emails and triggers that you will use to engage your subscribers. Then you can just put them in a long term campaign using a newsletter series.
So let's assume that for their first 10 days you have used auto-responders.
Then there is a special filter that you can add to a campaign series so that it will pick subscribers 10 days after subscription.
AND DATEDIFF(CURDATE(), iDate) >10AND DATEDIFF(CURDATE(), iDate) <90 AND DATEDIFF(CURDATE(), iDate) >10 General date subscribed vs List sign-up date
dateSubscribed - iDate
You have two options for which subscription date to use.
dateSubscribed refers to General subscription date. The first time a subscriber was added to your system.
iDate refers to List sign-up date. The first time a subscriber was added to this list. Occasionally these two are the same.
When working with one list it is better to use the iDate in your filters.
Auto-responders
Menu > Campaigns > Autoresponders > Create new
An auto-responder is a series of timely campaigns that are sent automatically to subscribers in the order and frequency you choose.
nuevoMailer supports auto-responders based on subscription date (list sign-up) or a subscriber field of type date.
nuevoMailer auto-responders are fully featured independent recurring campaigns with their own statistics that recycle forever.
nuevoMailer supports auto-responders based on subscription date (list sign-up) or a subscriber field of type date.
nuevoMailer auto-responders are fully featured independent recurring campaigns with their own statistics that recycle forever.
Here is an auto-responder that is sent 20 minutes after subscribing to a list:
Here is another example based on a custom subscriber field Wedding date:
As you can see we have one more option here: Full date comparison.
When checked this auto-responder will fire only once, exactly 7 days after the exact wedding day.
If not checked then it will fire every year, 7 days after the wedding date. In this case the filtering is done by checking only the month and day (and not year).
For birthday newsletters you do not want a "Full date comparison".
If I already have subscribers on my list, what happens for them when I create a new auto-responder for this list?
It depends on when the subscribers were added to your list (the list sing-up date). So if the date condition of the auto-responder is met they will receive the auto-responder.
To exclude subscribers that you manually import as an administrator using a bulk import method, check this option:
For older versions you can enhance your auto-responders using a filter:
AND  (1_subscribers.adminImported=0)   //For nuevoMailer v.9.5
AND  (1_subscribers.ipSubscribed NOT LIKE ‘%admin%’)    //For older versions
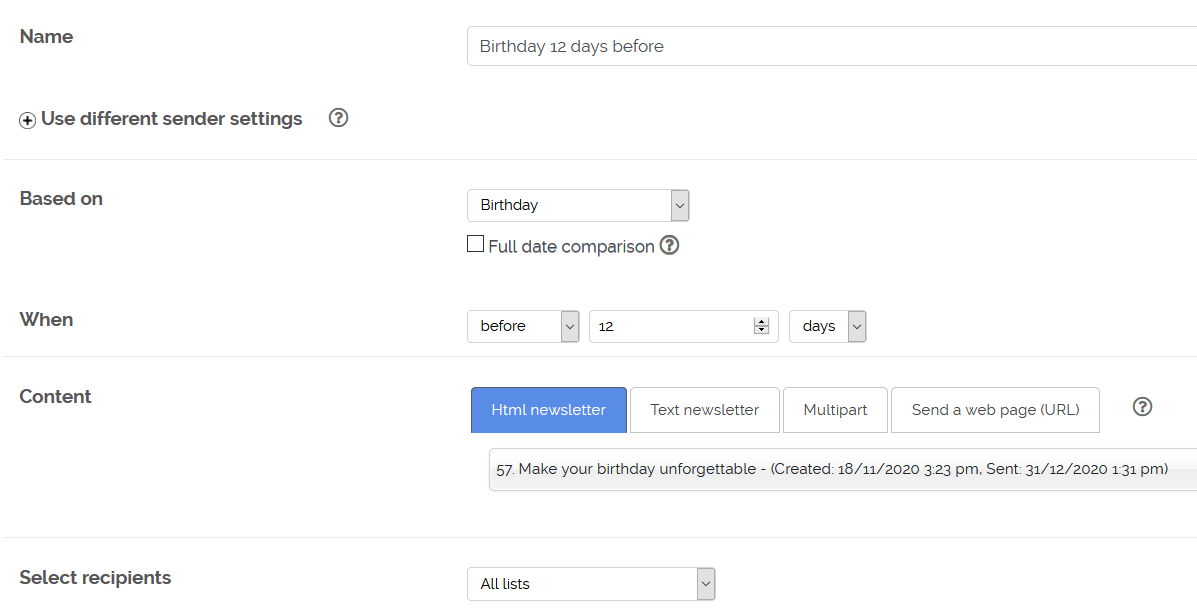
Birthday campaigns
With nuevoMailer you can capture (or import) your subscribers birthdays (or other anniversaries).
You create a birthday filter, a "Happy birthday" newsletter and a campaign that uses them.
The birthday campaign must be recurrent and run every day.
- Start by setting up a custom subscriber field (of type date) for storing birthdays.
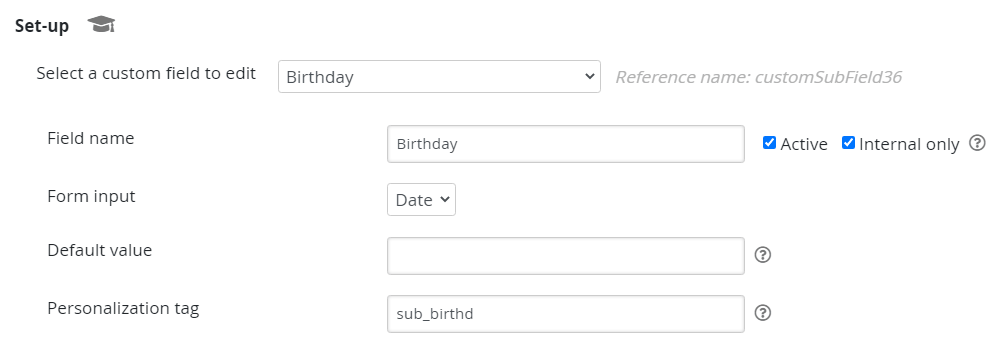
- Then in the same page define this field.

- Refresh your welcome page to verify that your birthday field is active.
 Follow the link and explore this page.
- Create an auto-responder
Other anniversaries?
What's described here can also be applied for other anniversaries. E.g. wedding dates.
Set-up another custom field to store these dates.
What's described here can also be applied for other anniversaries. E.g. wedding dates.
Set-up another custom field to store these dates.
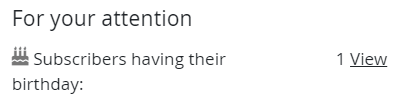
Birthday reminders for the administrator
These reminders are for you, the administrator.
You can set-up a cron job to run daily and notify you about this day's or next days birthdays.
To set the number of days in advance open the file inc/settings.php and change this variable.
These reminders are for you, the administrator.
You can set-up a cron job to run daily and notify you about this day's or next days birthdays.
To set the number of days in advance open the file inc/settings.php and change this variable.
$bDaysBefore=30; //Enter 0 for same day reminderFollow-up campaigns
You can create follow-up campaigns based on the clicks or views from a previous campaign.
When looking at your “Summary report” you can create a new campaign as a “follow-up campaign”. Your options are shown in the screen shots below:
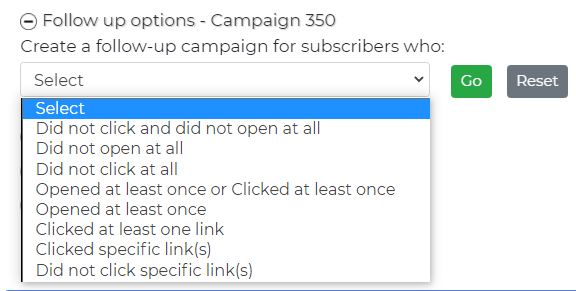
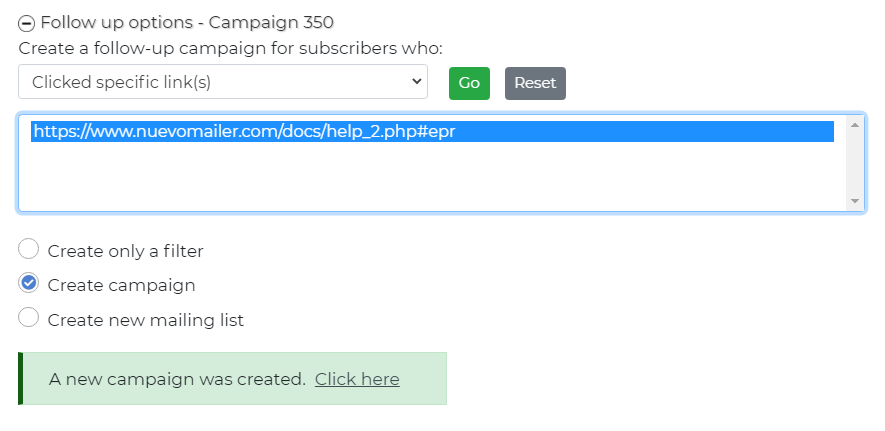
When looking at your “Summary report” you can create a new campaign as a “follow-up campaign”. Your options are shown in the screen shots below:
- You are creating a new campaign identical to the previous one (with the same lists, newsletters and subscriber tags). You can further edit this campaign if you need to do so.
- A filter is created in the background and it is added to this new campaign. It is the filter that will make the difference in the selection of subscribers in the new campaign.
- If the old campaign was already already using a filter this will not be appended in the new one.
- Create only a filter
Checking this box will crate only a filter and not a new campaign. You may want to use this filter in another campaign with different parameters. - If the campaign was sent to all subscribers then you can only create a filter (without a campaign). This is because filters can be used in campaigns to all lists or to selected lists.
In this case you will find the checkbox already checked and disabled.
For time-sensitive follow-up campaigns see auto-responders.
Email Triggers is another way for following up on an individual basis. See below.
Triggers
For a very good overview of the triggers functionality in nuevoMailer and implementation ideas see here.
This is the button for setting triggers: .
You will find in in your campaigns, newsletters, lists, and links pages.
Using triggers you can do the following:
You can set triggers at:
- Update a subscriber field
- Tag or un-tag a subscriber
- Send a single newsletter
- Add the subscriber to other list(s)
- Remove the subscriber from other list(s)
- Execute an outbound webhook
- A campaign (or auto-responder): click, view, email-sent.
- A specific newsletter: click, view. Will apply whenever this newsletter is used (in any campaign).
- A specific hyperlink: click. Will apply whenever this link is clicked regardless of the campaign or newsletter.
- On List opt-in: when a subscriber is added to a list. See also auto-responders here.
- On List confirm: when a subscriber confirms his subscription for this list.
Trigger inheritance (recurring campaigns, cloned and follow-up campaigns)
- Recurring campaigns are re-created automatically as soon as the previous one completes.
Therefore we have a parent which is the first one and children which are the ones that follow.
The same mechanism applies when you create a follow-up campaign from your Summary report. But not when cloning a campaign.
This is what we call a branch:

- Since nuevoMailer v.10, the triggers set on the parent will only apply on itself. Before v.10, the triggers set on the parent will also apply to the children.
- Since nuevoMailer v.10, the triggers set on the child campaign will also look and execute triggers set on its parent.
- If you delete the parent campaign the triggers set on it are also deleted. But not those set specifically on its children.
Setting an expiration for triggered emails
Assume you create a trigger to send a single email on an action such as a view or a click.
A subscriber may do a view or a click several times as soon as he receives the newsletter or even days or months later.
nuevoMailer can prevent the sending of the triggered email multiple times (with each view / click) by marking the triggered email as processed.
But sometimes it may be useful to fire this trigger again after some time and if the view / click action happens again.
For that reason we can set a trigger expiration period. Go Menu > Tools >Configuration settings and click on Additional settings. Scroll down to: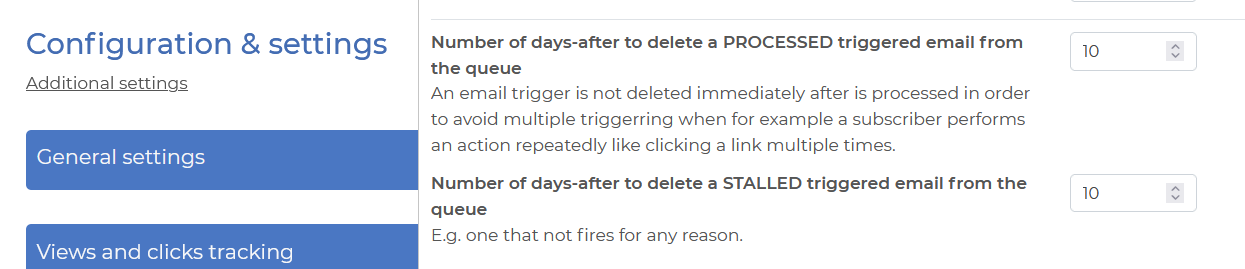
In older nuevoMailer versions you can do this in /inc/classUtil.php:
Triggered emails are processed by cron job #4 and are sent in batches.
The batch number is the maximum of these two: Default sender profile batch settings or 100.
So if you expect a significant volume of triggered emails adjust your settings and the cron job period accordingly.
Assume you create a trigger to send a single email on an action such as a view or a click.
A subscriber may do a view or a click several times as soon as he receives the newsletter or even days or months later.
nuevoMailer can prevent the sending of the triggered email multiple times (with each view / click) by marking the triggered email as processed.
But sometimes it may be useful to fire this trigger again after some time and if the view / click action happens again.
For that reason we can set a trigger expiration period. Go Menu > Tools >Configuration settings and click on Additional settings. Scroll down to:
In older nuevoMailer versions you can do this in /inc/classUtil.php:
/** Number of days-after to delete a PROCESSED triggerred email from the queue.*/
$this->usedTriggerDeleteDays    = 10;
/** Number of days-after to delete a STALLED triggerred email from the queue. E.g. one that not fires for any reason.*/
$this->deadTriggerDeleteDays    = 10;
Triggered emails are processed by cron job #4 and are sent in batches.
The batch number is the maximum of these two: Default sender profile batch settings or 100.
So if you expect a significant volume of triggered emails adjust your settings and the cron job period accordingly.
curl -l -s http://www.domain.com/mailer/admin/_sendTr.php?apiKeySender settings in triggered emails
By sender settings we mean the <from-email>, <from-name> values in the triggered emails.
Campaign sender settings (if applicable - if the trigger is derived from a campaign) will override the Sender profile settings.
By sender settings we mean the <from-email>, <from-name> values in the triggered emails.
Campaign sender settings (if applicable - if the trigger is derived from a campaign) will override the Sender profile settings.
You can read more about the various trigger options here.
Transactional emails
Building on the email triggers feature you can also send transactional emails from your own CRM/CMS or website using the api.
You only need to "post" a subscriber email and a newsletter ID. If the subscriber exists in your database then the newsletter will be personalized.
If he doesn't exist then you can optionally subscribe him at the same time, in one step.
Mailing filters
Overview
Filters are extra criteria that you can apply to a campaign and will result in excluding or including subscribers on the basis of demographic parameters, tracking behavior, subscription dates and more.
You can create a new filter by going to:
You can view your filters under Menu > Filters > View filters.
Every filter contains a short description and SQL code. You can edit both if needed. Simply click on the description or the code.
There is no need to know SQL in order to create filters. The editing options are provided for users who know and want to do more advanced things.
Filters can be used when you send a campaign to All lists or to Selected lists.
Campaign follow-up filters
Such filters are created automatically when you create follow-up campaigns.
Such filters are created automatically when you create follow-up campaigns.
Demographic filters
Menu > Filters > Create new > Based on subscriber properties/data
Menu > Filters > Create new > Based on subscriber properties/data
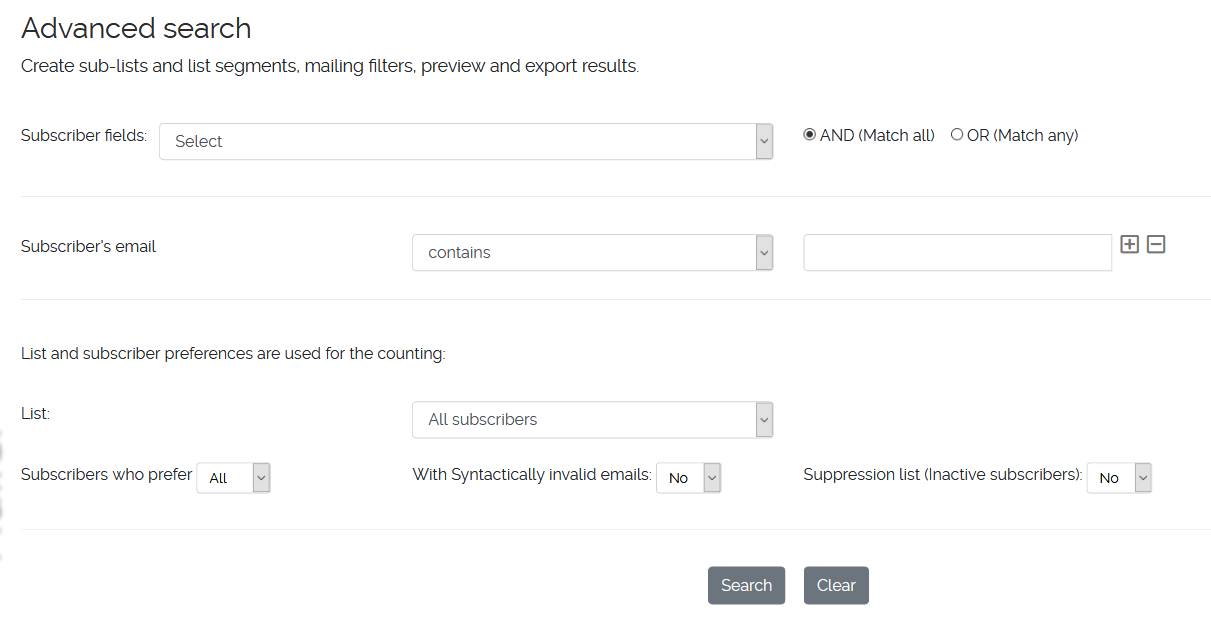
In this page you can:
- Perform advanced searches on subscribers using any of their available fields and tags.
- See subscribers with soft or hard bounces.
- Preview and export the results to spreadsheets like Excel, CALC/LibreOffice.
- Create filtered lists (sub-lists or list segments) based on the search results. The parent lists remain intact.
- Create filters that you can save, edit, refine and use in your campaigns.
Empty, blank filter
Menu > Filters > Create new > Create a blank filter
You simply create an empty filter and then you can add your own sql code or copy code from another filter.
Menu > Filters > Create new > Create a blank filter
You simply create an empty filter and then you can add your own sql code or copy code from another filter.
Refining a filter
If you are familiar with sql syntax you can change the sql code and refine an existing filter. You can also merge filters or create your own.
If you are familiar with sql syntax you can change the sql code and refine an existing filter. You can also merge filters or create your own.
Testing a filter
You can test a filter when creating a new campaign. You select the list(s) and the filter(s) and you click “Count”.
Count with and without selecting a filter so you can see the difference.
You can test a filter when creating a new campaign. You select the list(s) and the filter(s) and you click “Count”.
Count with and without selecting a filter so you can see the difference.
Examples & tips
Using filters you can find and create a sub-list or a mailing filter or export subscribers who:
Using filters you can find and create a sub-list or a mailing filter or export subscribers who:
- Come from a specific country and subscribed after a certain date.
- Have a specific zip code.
- Have not updated their account since a given date.
- Did not have any activity since a given date.
- Come from the same company.
- Have the same domain in their email address.
- And much more...
Create a new list segment or a mailing filter?
If you need a new list then create a new list segment with the search results.
If you only want to do a few mailings to this subscriber group then it is perhaps better to create a mailing filter. The answer really lies in your subscriber management approach.
If you need a new list then create a new list segment with the search results.
If you only want to do a few mailings to this subscriber group then it is perhaps better to create a mailing filter. The answer really lies in your subscriber management approach.
Merging filters
You can merge (add filters together) by putting together the sql code of each filter and using an AND or an
OR operator.
Here is an example. One filter that picks subscribers with Hotmail and Yahoo email accounts.
Here is an example. One filter that picks subscribers with Hotmail and Yahoo email accounts.
AND (1_subscribers.email LIKE '%hotmail%' OR 1_subscribers.email LIKE '%yahoo%')
A very handy filter idea - Exclude subscribers of a specific list
Attention: since nuevoMailer v.8.6 you can do this directly when you create a campaign without using filters.
Usually there is overlap between lists. Meaning that subscribers belong to more than one list.
Q: I want to make a campaign to lists A, B, C but I do not want to include anyone on those lists who is also in list D.
A: Create a campaign to lists A, B, C and use this filter
AND 1_subscribers.idEmail NOT IN (SELECT idEmail FROM 1_listRecipients WHERE idList=D)