Subscribers & mailing lists
Mailing lists
A mailing list is a good and necessary tool for managing your subscribers.
- You may create as many mailing lists as you like.
- For every mailing list you may define a name and a short description that your subscribers can see if you give them this option when creating an opt-in form.
- A list can be public or hidden.
When hidden it is not visible in the Subscriber portal. - A subscriber is assigned (subscribed) to one or more lists. A non-assigned subscriber is one who is not subscribed to any lists. It is a good organizing practice to use lists and assign your subscribers to lists. If however a subscriber has opted-out from all lists but he did not do a global-opt out then he will remain in your system as non-assigned.
- A subscriber can be verified/confirmed in one list but not in another depending on how you use the double opt-in verification system. You can send confirmation reminders or manually confirm all subscribers with a single click.
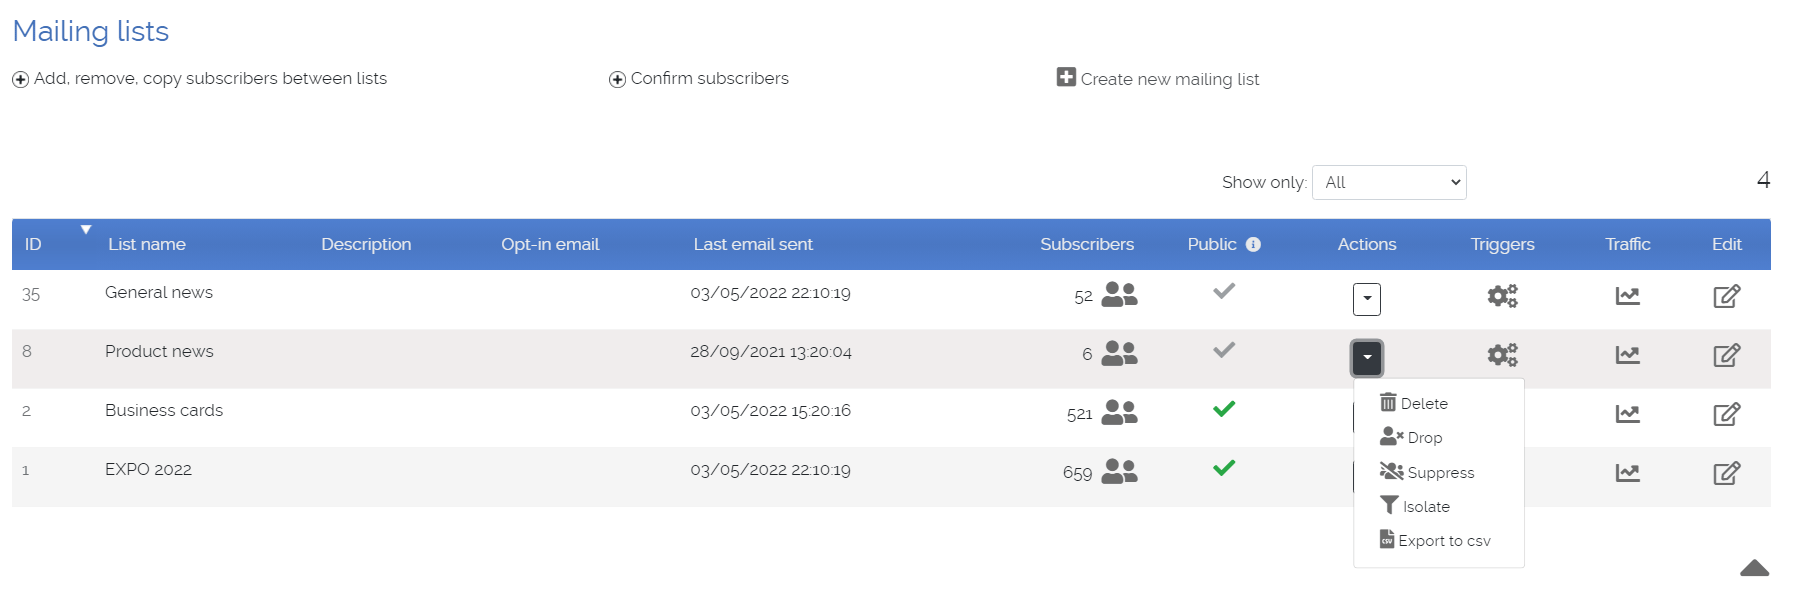
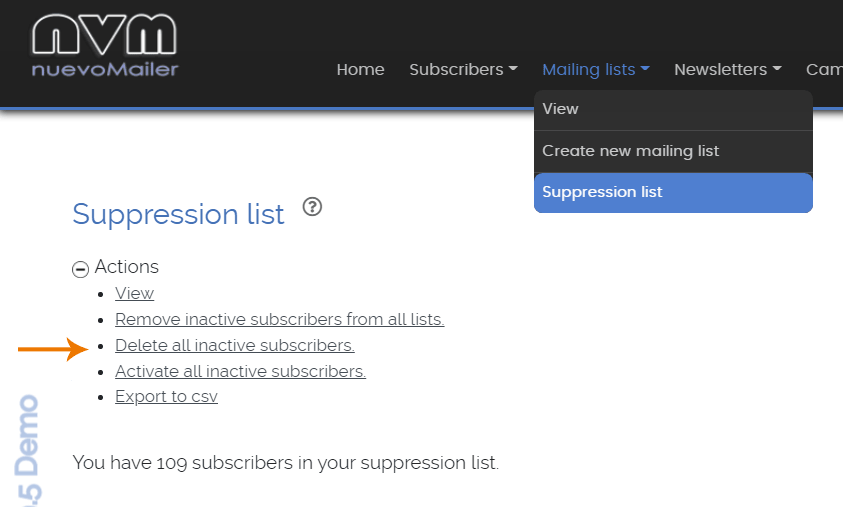
- Suppression list - Syntactically invalid emails: subscribers in the suppression list or with syntactically invalid emails do not appear in your lists count.
- To delete Suppression list emails go to Menu>Mailing lists>Suppression list and expand the Actions tab.
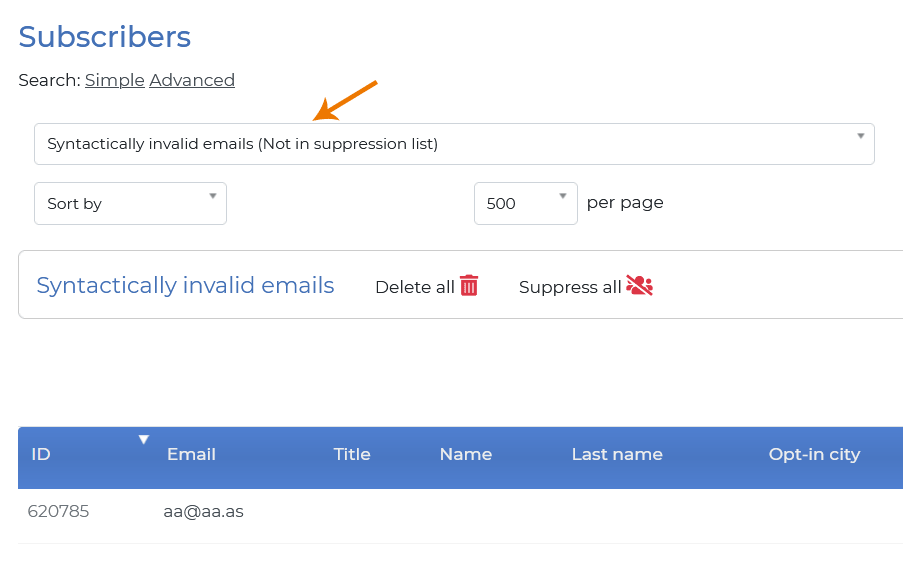
- To delete Syntactically invalid emails emails go to your Subscribers page and list them:
- An inactive/suppressed subscriber can be activated again by the administrator or if he voluntarily uses an opt-in form to subscribe.
Custom list settings
They are still available in nuevoMailer ESP v.3.6.
- Custom list settings are handy when you want to handle opt-ins from different sites and logically you will want to personalize the subscriber experience by using different email accounts, landing pages and greeting emails.
- In the same manner they are useful when sending campaigns on behalf of others.
- A prerequisite is that the campaign must involve this list only (one list).
- In campaigns where custom list settings are involved it is recommended to use only the
"List opt-out" link.
If you know for sure that the subscribers are not assigned to any other lists then you can also use the "global opt-out" link and/or redirect the subscriber to the Subscriber portal to update his account. - With opt-in forms, if you choose to apply a list's custom settings then the Global settings will not apply.
- You can access the custom list settings when editing a list.
Follow-up lists
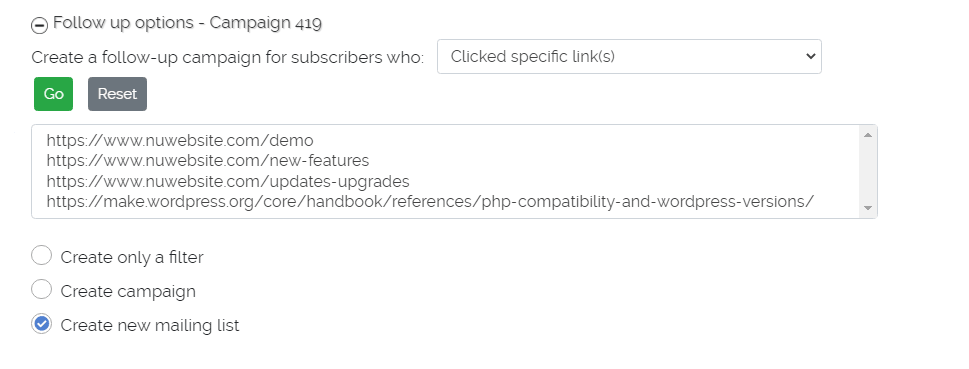
You have these options:
- Select
- Did not click and did not open at all
- Did not open at all
- Did not click at all
- Opened at least once or Clicked at least once
- Opened at least once
- Clicked at least one link
- Clicked specific link(s)
- Did not click specific link(s)
The applications of this feature are many. It allows you to isolate, group and export subscribers based on the above actions by creating a new list.
The follow-up list appears in your lists page and it is like any other list.
The original list remains intact and it still contains all the subscribers that were originally assigned to it.
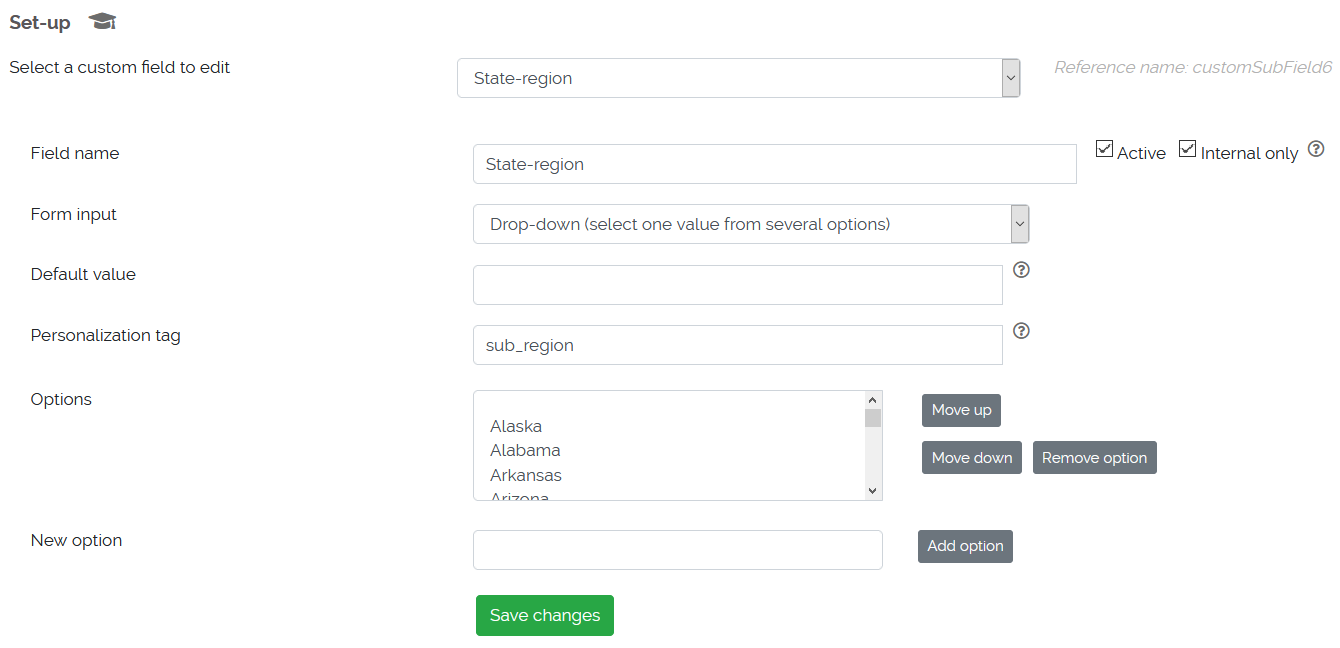
Custom subscriber fields
Except the email (the password and some other auxiliary fields) all other subscriber fields can be defined by you and are entirely optional.
-
By default nuevoMailer is loaded with 40 custom fields (text: 25, integer:5, decimal:5, date: 5 fields.
Should you need more it is easy and simple to add. Contact us for instructions. -
These different field types allow you to use comparison operators when creating
filters, run specialized queries and a lot more.
Example: you may create a custom field that asks subscribers to give a numeric value, an exam score or their age. -
When the form input is a drop-down menu the first option should be blank.
- When the form input are checkboxes or radio buttons all options must have a value.
-
To import multiple values at once, instead of adding them one by one, separate them with ||.

- Click "Add option". Click "Save changes". Reload the field from the menu and you will see your new options.
-
The same principle applies when importing subscribers.
Example: you have a custom field "Favorite colors".
And you want to import your values from your native source (csv, database) when importing your subscribers.
These values should be given in nuevoMailer in this way:
"me@domain.com","Black||White"
"you@other-domain.com","Green||White" -
Every time you add a custom field open a subscriber page, refresh and see it in action.
Create also an opt-in form to see how the field appears in the form.
Open an html newsletter and click the "Personalization tag" menu button to test your Personalization tag. -
Inside the folder install you will find the file states_regions.txt from which you can copy directly lists
of World countries, US States, Italian regions, Australian, Canadian provinces etc.
These values will work with the Google geomap graphs that you can generate in nuevoMailer.
Important but optional: before using the geomap graphs you must define your country and/or region inside the file inc/settings.php and the custom fields you assigned for country/region.
- Passwords are required when a subscriber attempts to log in the Subscriber portal to update his subscriptions.
- Passwords are generated automatically when you add/import subscribers. They are encrypted (since v.9).
- In your subscribers menu you have a utility to regenerate subscriber passwords.
- Asking for a password in your opt-in forms is optional.
How to add - import subscribers
- Add one subscriber at a time from the administration panel.
- Using opt-in forms in your website.
- Bulk import from CSV/txt files (with field mapping and map saving).
- Bulk import from external databases (MS SQL and mySQL with field mapping and sync options).
- Bulk import a list of emails via copy-paste into a text box.
- Using the api. See details.
- Using the opt-in by email feature.
- Add or update a subscriber from your own CRM/CMS
- A check for missing values
- A check if the email entered is of a valid format
- A check for duplicate entries based on the email entered
- A check for erroneous or invalid entries
Common settings
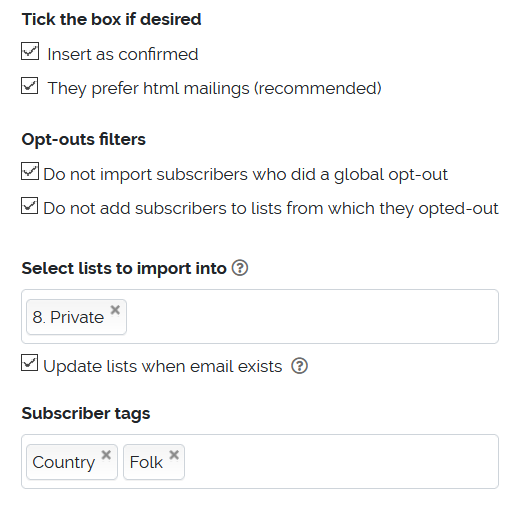
Insert as confirmed
Checking this box will import the subscribers with a confirmed/verified status for each list you assign them.
They prefer html mailings (recommended)
When you create opt-in forms you have an option to ask the subscriber whether he prefers to receive your newsletters in Text or in Html format. It is better to check this box since all modern email clients today support Html.
Opt-outs filters
Keep them checked so you will not import again subscribers who opted-out in the past.
Select one or more lists
You may also specify to which list(s) they will be assigned.
Update lists when email exists
Check this box if subscriber X is already under list A and now you do a new import and you want to assign him under list B. If you do not check it he will be considered as duplicate and he will not be assigned to list B.
Subscriber tags
Choose one or more tags. Tags is a way of further segmenting/organizing your subscribers. A subscriber can have several tags.
Subscribers’ passwords are assigned automatically.
Import a list of emails
Menu > Subscribers > Add - Import > Add many > Import a list of emails- Enter one email per line.
- This is the quickest way to add subscribers when you have a plain list of emails.
- You may add a large number of subscribers (even a few hundreds or thousands).
- Normally your PHP post-max-size value limits the size of data you can post with a form. You will get an error if you reach this limit. Reload and try again with less data in this case.
- Depending on the number of subscribers and your server set-up it might take some time. At the end you will get a report on the number imported and if any duplicates were found and therefore not imported.
Import from csv/txt files
Menu > Subscribers > Add - Import > Add many > Import from csv/txt filesThe file type can be .csv or .txt or have a different ending. It should be a plain text file with values separated with a delimiter. Each line in the file must correspond to one subscriber.
- Upload the file
- Import data from the file. In order to import the data first you must upload the file at the server.
When you see that the file appears inside the "Data files manager" it means that it is already uploaded. You cannot import from a file that hasn't been uploaded and does not appear inside the "Data files manager".
Problem uploading?
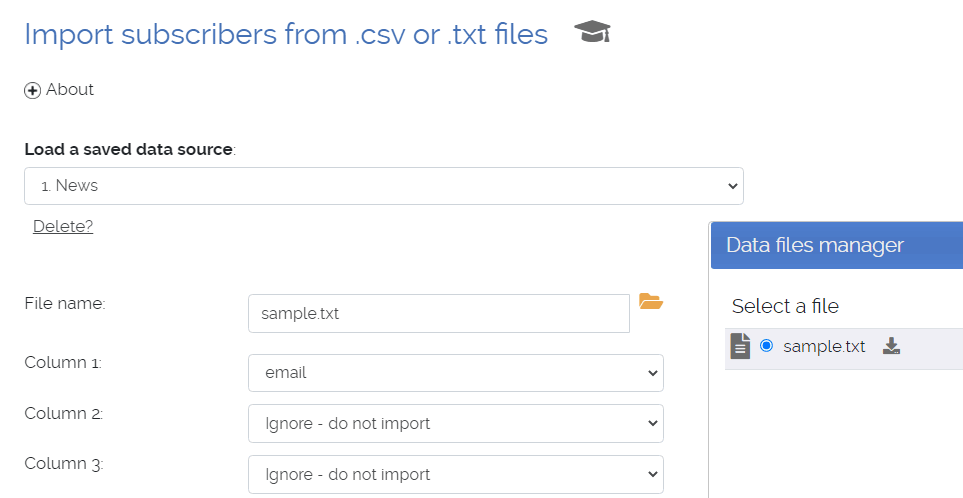
Click the folder icon next to the "File name" and open the "Data files manager".
Click the radio button in front of the file you want to import and the name of the file fills the "File name" input box.
The email is always required. One column must be the email. You will get a warning message if you miss it.
Subscribers’ passwords are again assigned automatically.
Then choose the field-column mapping, the options that apply (at the right side) and start the import.
In this way you don't have to enter all the same information again the next time.
Using a simple text editor open your file and check the delimiter and whether your values are enclosed by double quotes.

email@domain.com, first name, last name
other@domain.com, Jack, Boom
someone@domain.com, , Doe
mary@domain.com, Mary,
Note that the 3rd line does not have a value for first name. As long as the comma is there the line is still valid. Simply there will not be a first name for this subscriber. Similarly the 4th subscriber does not have a last name.
"other@domain.com", "Jack", "Boom"
"someone@domain.com","" , "Doe"
mary@domain.com, Mary,
If while importing you see an error like Incorrect string value: '\x82\xC4\xE3gew then open your file using a text editor and do a "Save as..." in utf8 encoding.
Very large files take longer to process and may result in time-outs.
In such cases it is advised to split your files into smaller ones.
To get an estimate check your subscribers to see how many new ones were imported.
Most common problems are covered in the paragraphs above. However, some times an import starts, runs smoothly and then suddenly stops.
The error you will see dictates what action to take. For example, this may be because of a time-out or a malformed line in the file.
Go to your subscribers and see if any emails were imported. Copy the last/latest email that was imported.
Open your csv file, search for it and check the line that comes after. This is probably the line that created the problem.
In order to upload a file your data_files folder must have write permissions or chmod755 (in some cases chmod777).
In addition the file size must be smaller than the PHP variables upload_max_filesize & post_max_size.
Since v.8.6 the file manager alerts you about folder permissions and the maximum file size allowed for uploading.
To check permissions try uploading a small or empty file. If that works your permissions are Ok.
If you experience a problem where the whole file is read as one line try this. Open your file with your text editor and do a “Save as ...“. Somewhere you will have an option for Windows (or PC – instead of Mac/Unix). Save it as such and upload it. Then try importing again. This is due to a PHP issue with line endings in the file.
Import from another database
Menu > Subscribers > Add - Import > Add many > Import from another databaseSome key points about this feature:
- You can import from another mySQL or SQL Server database.
- You can save these connections. Saved connections are called "Data sources". This facilitates periodic imports. You do not have to enter the same information every time.
- The system guides you and tells you when you do something wrong or a value is missing.
- If you want to import passwords and these are encrypted in your source database, then it is better not to import them and let the system assign new ones automatically.
- You can automate and synchronize the importing with a cron job. See data source synchronization.
Cron synchronization results are automatically emailed to the administrator whose api key used. - The Custom SQL statement applies to the source database.
Examples & applications:
Can be used to filter/segment subscribers when importing by the criteria you want.
You can join and bring data from different tables from your source database.
Opt-in by email
- You can designate one opt-in email account for each mailing list. Your subscriber sends an email to this account and he is subscribed. You will find this option where you edit your list:
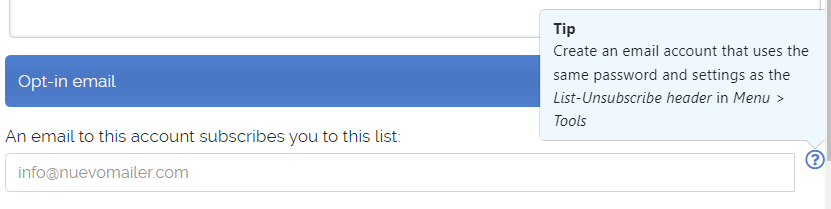
- These email accounts should be from the same domain and use the same password as your "List un-subscribe header" feature.
- This does not mean that you have to activate the "List un-subscribe header" (although it is good to use). They simply use the same settings.
- Do not use the same email account for different lists. Use different emails but with the same password. That's because the process empties the mailbox and if different lists share the same email it would work only for the first list.
- You may download these emails to your email client but you must leave a copy at the server. After the processing it is deleted.
- The subscriber is added as confirmed/verified depending on the "double opt-in" settings used in your default sender profile.
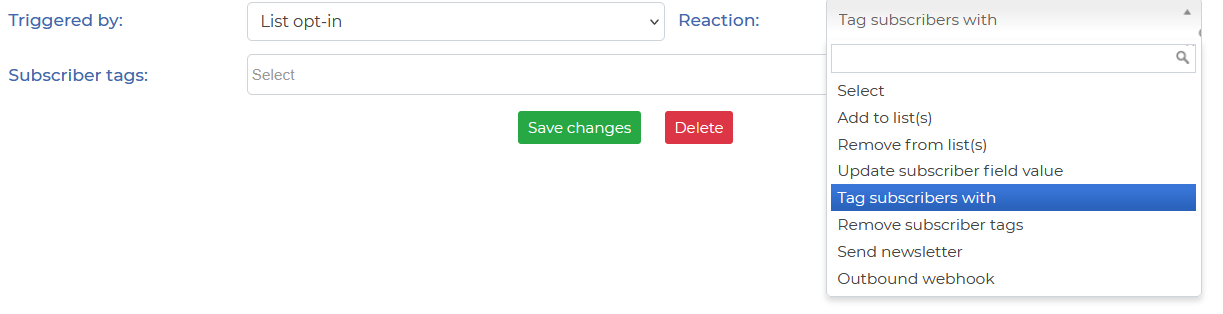
- You can setup a trigger for this event and mailing list. It is triggered by "List opt-in" and you can choose any reaction you want.
- You must also set-up cron job #11 to process these mailboxes.
Add or update a subscriber from your own CRM/CMS
Here is a couple of methods and code examples.
<iframe src="http://yourdomain.tld/mailer_dir/subscriber/subProfile.php?apiKey=xxxxxxxxxxxxxxx&email=email@domain.tld" style="width:100%;max-width:1000px;height:800px;border:0"></iframe>
Copy this function in your own page. You can use any function you want that opens a new pop-up window.
<script language="JavaScript" type="text/javascript">
function openWindow(url, width, height) {
    left= (window.outerWidth-width)-20;
    var params = 'scrollbars=yes,resizable=yes,status=no,location=no,toolbar=no,menubar=no,width='+width+',height='+height+',left='+left+',top=100';
    popupWin = window.open(url, "_blank", params);
    popupWin.focus();
}
</script><a href="#" onclick="openWindow('http://yourdomain.tld/mailer_dir/subscriber/subProfile.php?apiKey=xxxxxxxxxxxxxxx&email=email@domain.tld', 1000, 1000);return false;">Open subscriber profile</a>
It is not a bad idea to rename the page subProfile.php.
Export subscribers to a csv file
Menu > Subscribers > Add - Import -Export > Export to csv- You can choose the delimiter (what separates the values).
- All active subscriber fields are exported.
- Values are enclosed by double quotes by default.
- Each subscriber takes a new line in the file.
- The generated file is named list_name_timestamp.csv and is saved inside the data_files folder. The folder must have write permissions or chmod755 (in some cases chmod777) so that files can be written to it.
- You can export all subscribers or by list.
Create the list and then export this list as explained in the previous paragraph.
Then you can delete the list if you no longer need it. It does not affect other lists neither the subscribers it has.
Manage dormant subscribers
Menu > Subscribers > Clean-up - Delete > Manage dormant subscribers- Keep in mind:
- Subscribers that are already in the suppression list are not included in these results.
- You can optionally use a date filter. For example you may want to remove subscribers who did not have any action after a given date.
- If you are working with very large numbers such operations (delete/remove/suppress) may take some time.
- All subscribers
- Delete: the subscribers are completely removed from your system.
- Suppress and remove from all lists: the subscribers are removed from all lists and they are also added in the suppression list.
- Move to this list: the subscribers are removed from all lists and you will be prompted to a select a list to move them to.
- By list
- Remove from this list: they are removed from this list. But they remain in the system, perhaps under other lists.
- Suppress and remove from all lists: the subscribers are removed from all lists and they are also added in the suppression list.
- Move to this list: the subscribers are removed from all lists and you will be prompted to a select a list to move them to.
Opt-in forms
Menu > Subscribers > Opt-in / out forms- Use the builder to create opt-in forms for your websites.
- The email is always required and is added to the form automatically. All other subscriber fields are optional.
- When you set a field as required then the subscriber must complete this field otherwise he cannot complete the subscription.
- It is handy sometimes to use hidden lists. You can read below about this.
- You can preview and test your form before saving it.
- New in v.8.7: after saving a form you can re-open it for editing and add/remove fields and options.
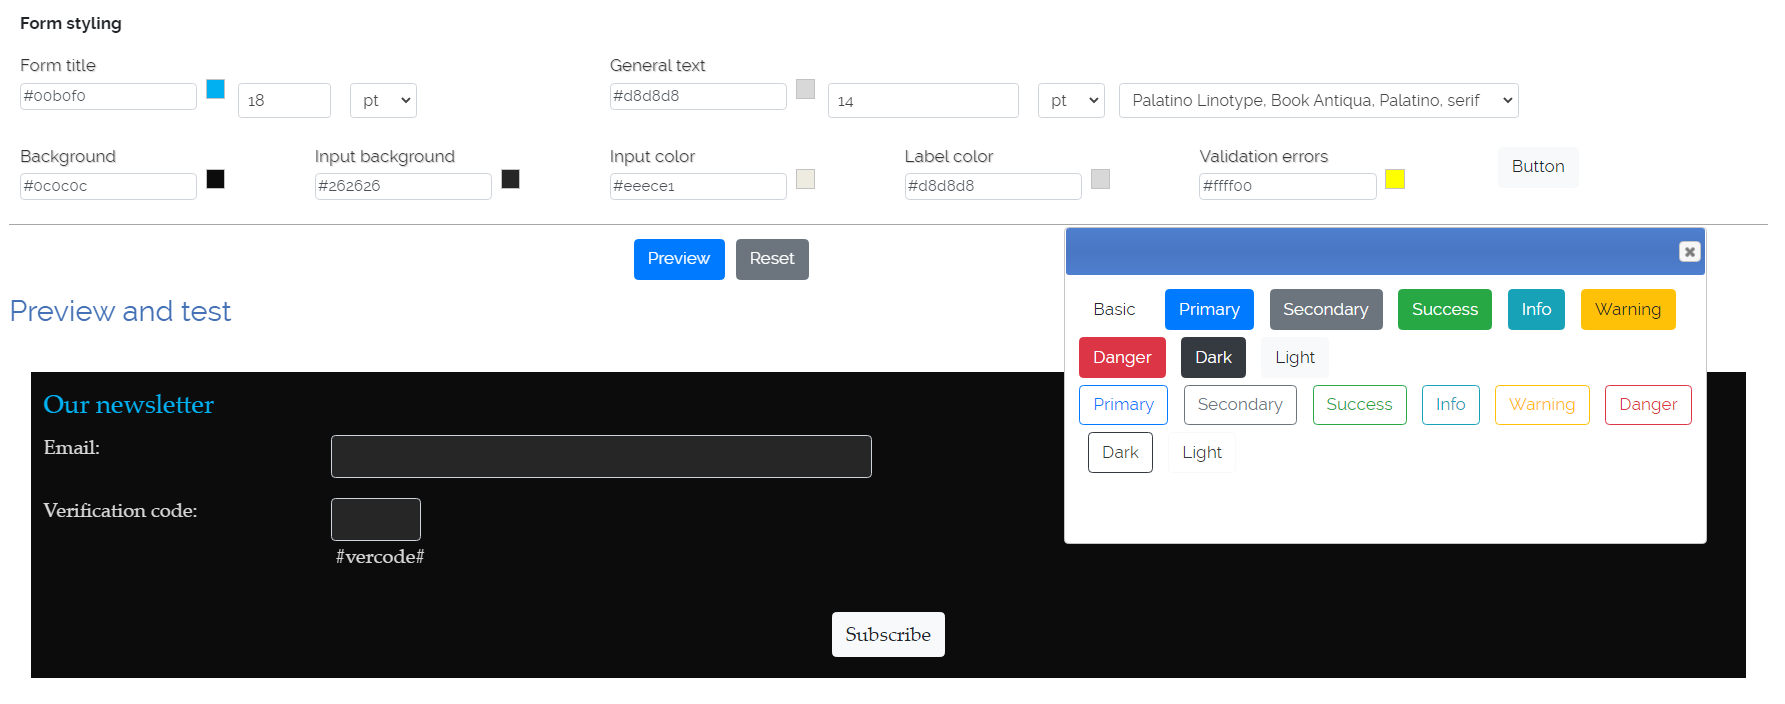
- New in v.9.5: when creating a form you can set your own font styles, colors and background colors.
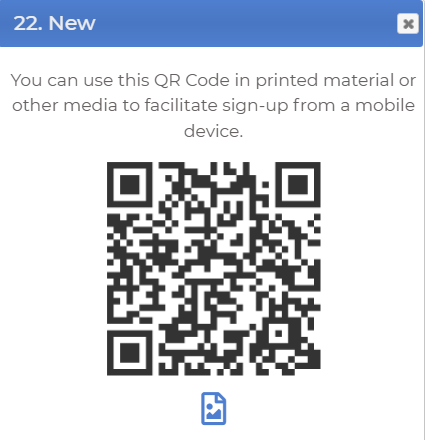
- New in v.9.6: you can create QR codes for use in printed material or other media to facilitate sign-up from a mobile device.
For example, in a flyer that you distribute in an event.

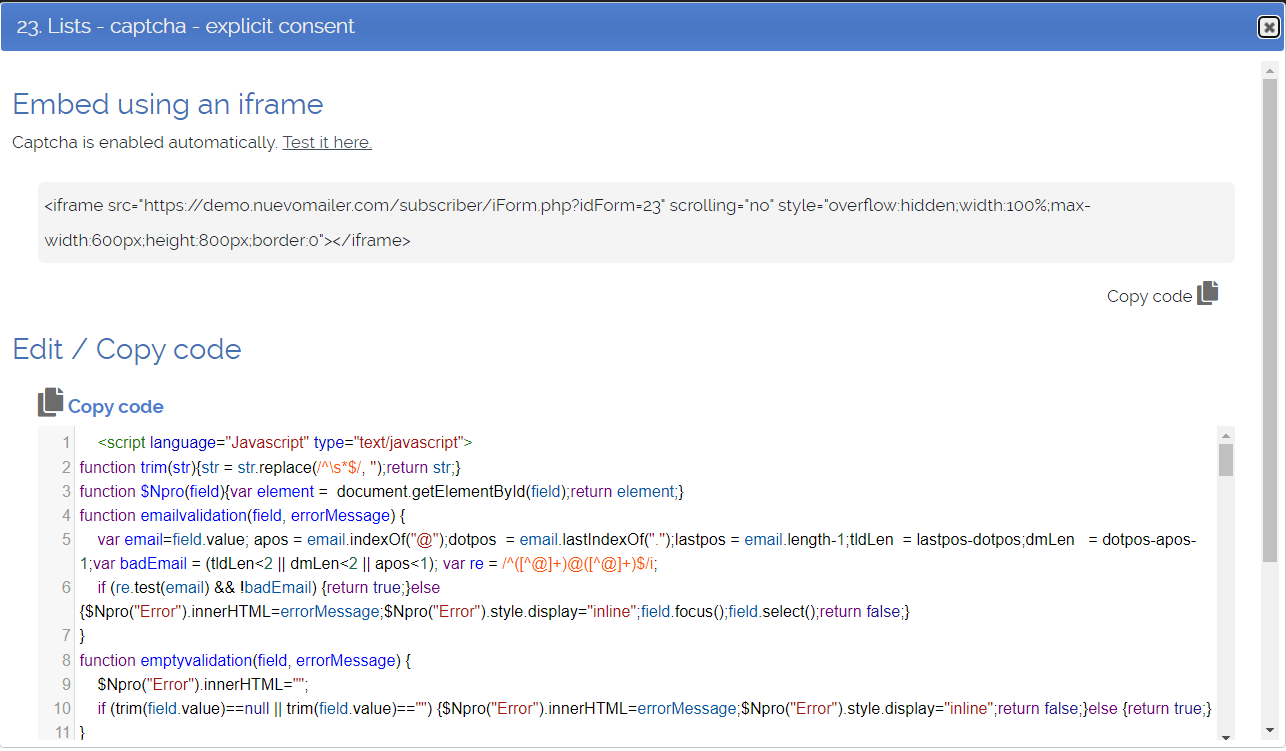
The best way to embed a form in your website pages is using an iframe. Click this icon
- You can see and copy the iframe code snippet.
A captcha if you added one in the form will work automatically.
This is a dynamic way of embedding a form. If you make changes to the form then these are active immediately. - You can also see the Html code of the form which you can copy-paste inside other html content. This is a static way and you cannot use the captcha in this case.
- You can make changes in the Html code that you see above and save them. But if you rebuild your form these changes will be lost.
- Another method for loading a form using Javascript is presented in this document.
You can adjust the size of an iframe with the width and height properties. Embed the iframe code in your page, test and adjust height (usually) and width until it is displayed fine.
<iframe src="https://demo.domain.com/subscriber/iForm.php?idForm=23" scrolling="no" style="overflow:hidden;width:100%;max-width:600px;height:800px;border:0"></iframe>- With nuevoMailer v.9.5 you can choose your own styles when building the form. And in 99% of cases this is sufficient.
- Basic Bootstrap styles are used. The page that loads the form is /subscriber/iForm.php. Bootstrap css is loaded in this page.
- Editing the form's Html code directly: you can, as explained above. However, if you edit and rebuild your form these changes will be lost.
Outbound webhooks (External POST requests)
Menu > Subscribers > Outbound webhooksFor example you can use this feature when your CRM/CMS has an API to receive data from other systems.
First create the webhook
What you actually do here is to map nuevoMailer subscriber fields with the target system fields.
The following are the minimum required: Target field, Email, Target URL.
Testing the webhook
Open a subscriber profile page for editing. You will see this:
 Click the icon and you will open a pop-up window where you can select a webhook and execute it.
Opt-in form data
When creating or editing an opt-in form you will see this option:
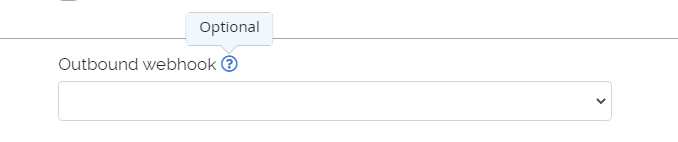 Every time the opt-in form is used the webhook sends the subscriber to your target.
Opt-outs
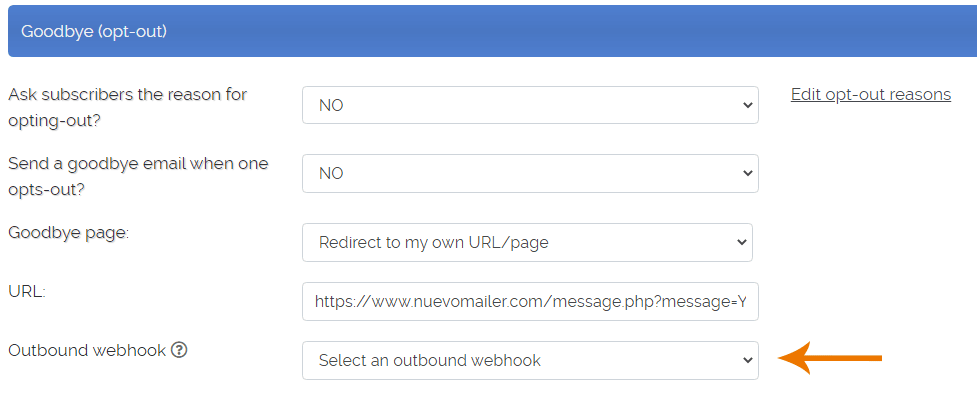
Open the Sender profile Goodbye settings:
Menu > Tools > Sender profiles
Expand the Goodbye section. You will see this option.
Bounces
Go to your Bounce servers page:
Menu > Tools > Bounce manager settings > Bounce servers
You will see this option.
Clicks & views/opens
This is done using Triggers. Such a trigger can be set on the following events:
- A campaign (or autoresponder) click and/or view.
- A newsletter click and/or view.
- A specific hyperlink (click). Go to Menu > Reports > Most clicked links,
- List opt-in event.
- List confirm event.
When you edit/create your trigger you will see this option/reaction available. Here is a hyperlink example.

For developers: technically speaking you are doing POST using CURL. In case you want to customize the specifics you will find the code in the file /inc/extPost.php.
in your api add the following parameter in the subscriber posted data:
"nvFormTracker"=>X,
X is the opt-in form ID for which you have assigned an outbound webhook already. nuevoMailer will take care of the rest.
Double opt-in
Menu > Tools > Sender profiles
Open a sender profile for editing.
 Then when you create an opt-in form you can select the Sender profile to use:

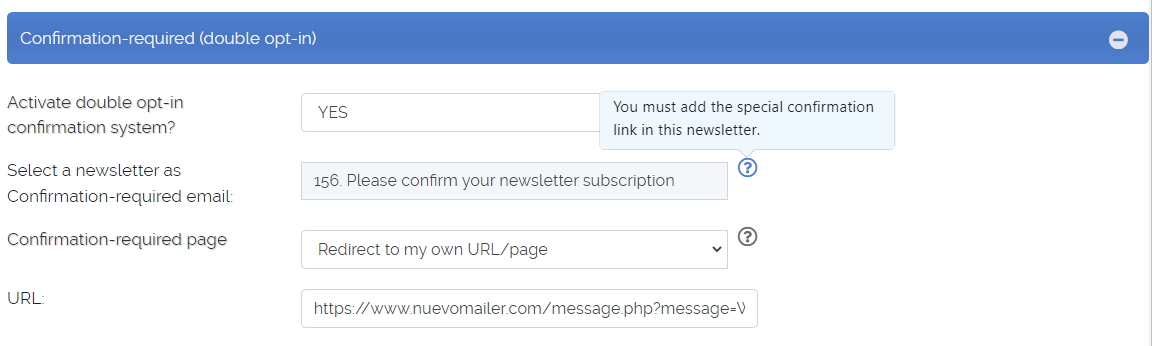
- The subscriber is inserted with the status of "un-confirmed" (unverified).
- He then sees the "Confirmation-required" page (or redirected to the URL you want).
The "Confirmation-required" email is sent automatically asking to confirm the subscription. - He clicks on the confirmation link in the "Confirmation-required" email, his status changes
to "confirmed" and a new window opens with the "Welcome" page (or he is redirected to the URL you want).
The "Welcome" email is automatically sent (if active).
- The subscriber is inserted with the status of "confirmed".
- He sees directly the "Welcome" page.
The "Welcome" email is automatically sent (if active).
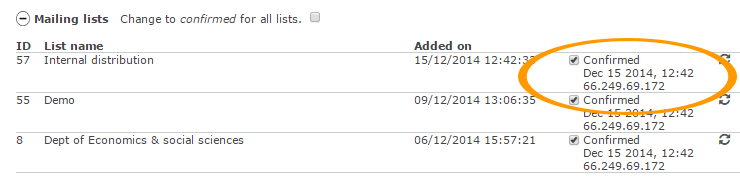
- Confirm all: you can manually confirm all subscribers with a single click.
- Send a confirmation request: you can create a campaign just for asking your subscribers to confirm.
This may be a legal requirement in some countries.
Or you may want to send a confirmation reminder to subscribers who voluntarily subscribed but they never completed the confirmation process.
Re-confirmation campaigns
Also called re-permission campaigns.
The main objective is to get your subscribers to re-affirm their relationship with you and explicitly confirm that they want to receive your newsletters.
It is also a great idea to re-engage dormant subscribers.
When to send a re-confirmation campaign
- When changes in the laws dictate or necessitate such action.
- When you want to do a list clean-up.
- When your newly acquired list is of dubious origin.
- When you want to sort-out dormant subscribers (those who never click neither open).
How to do it
There are several ways. Keep in mind that in nuevoMailer subscribers are confirmed (or verified) for each mailing list.
Whatever method you choose make sure you have a Global opt-out link in your newsletter that results in permanent subscriber deletion.
Here are some ideas and approaches which you can also combine depending on your lists status and business processes.
- If you imported your subscribers as unverified then the most simple way is to send a Confirmation
request.
In your admin panel go Menu > Subscribers > Utilities > Confirm > Send a confirmation request and follow the instructions. - Send a campaign where the newsletter has a hyperlink asking explicitly your subscribers to click it.
This link should direct to a "Thank you" landing page. Steps:
- Create the newsletter and add the link to the "thank you" page.
- Send a sample to yourself to try it out.
- Go Menu>Reports>Most clicked links, find this link and add a trigger to it. E.g. add to new list(s), remove from other list(s).
- Create and send a campaign with this newsletter.
It is easy to put your re-confirmation campaigns in auto-pilot.
You can find a simple step-by-step example here.
Using triggers allows us to do a few more tricks. For example, some subscribers may open the newsletter but will not re-confirm neither opt-out.
We can put a trigger at the newsletter level (or at campaign level) which upon "newsletter view" (not click!) updates a custom subscriber field with some value (or adds him/her to other list(s)).
This segmentation allows us to create filters and repeat our campaign.